Branches
The Branches page allows administrators to manage all business locations operating under an organization. Each branch represents a physical or operational location where services are provided.
This page enables you to create, update, manage, and monitor all branches from a centralized view.
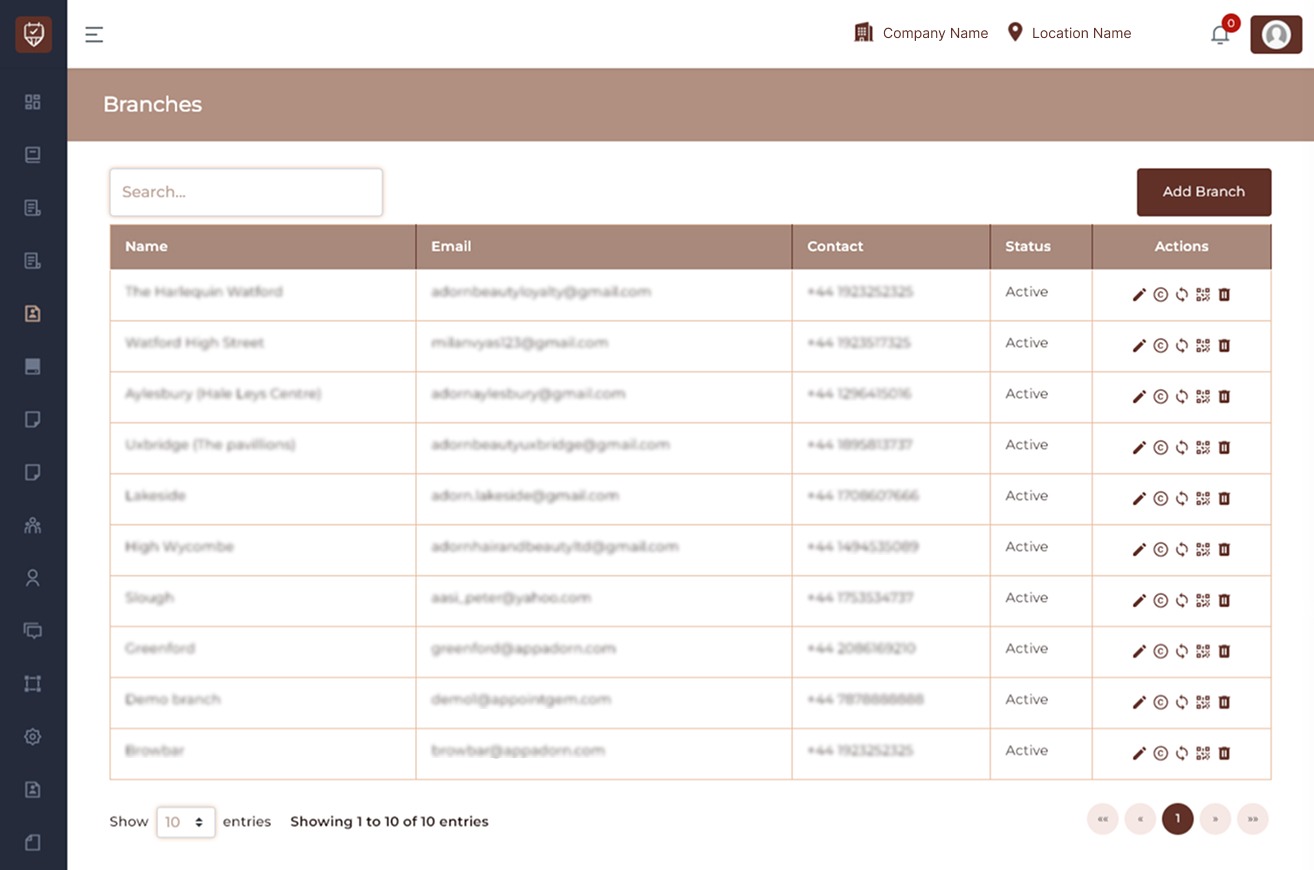
The Branches page displays a structured table containing:
- Branch Name
- Email Address
- Contact Number
- Status
- Action Controls
Only authorized users should have access to this page, as it contains operational branch information.
Search Function
The search bar allows you to:
- Quickly locate a specific branch
- Filter branches by name
- Reduce visible records for easier management
Search results update automatically as you type.
Add Branch
The Add Branch button allows administrators to create a new branch location.
When adding a branch, you typically configure:
- Branch name
- Email address
- Contact number
- Address/location details
- Operational settings
- Status (Active/Inactive)
After saving, the branch will appear in the main table.
Table Columns Explained
Branch Name : Displays the registered name of the branch location.
Email : Shows the official branch email used for communication and notifications.
Contact : Displays the primary contact number assigned to the branch.
Status : Indicates whether the branch is currently:
- Active – Operational and accepting bookings
- Inactive – Temporarily disabled or not operational
Inactive branches may not appear in booking selections.
Action Icons : Each branch row contains action icons that allow administrators to manage branch settings.
Edit Branch
Allows you to:
- Update branch information
- Modify email or contact details
- Change operational settings
- Update branch status
Copy Branch
Creates a duplicate of the selected branch. This is useful for:
- Opening a new location with similar setup
- Replicating services and configurations
- Quickly creating multiple branches
All copied details can be modified after duplication.
Sync Branch
Synchronizes branch data with the system. This may be required when:
- Updates are not reflecting immediately
- Configuration changes need refreshing
- System modules require synchronization
Generate QR Code
Generates a unique QR code for the branch. The QR code can be used for:
- Direct booking access
- In-store scanning
- Marketing materials
- Posters and displays
When scanned, customers are redirected to the branch’s booking page.
Delete Branch
Permanently removes the branch from the system.
Important:
- This action may remove associated data.
- Ensure no active bookings are pending before deletion.
- Confirm the branch is no longer required.
Deletion should be restricted to authorized administrators only.
Pagination Controls
At the bottom of the page, you can:
- Select the number of entries displayed
- Navigate between pages
- View total branch count
Best Practices
- Regularly verify branch contact details.
- Deactivate branches instead of deleting when temporarily closed.
- Use QR codes for marketing and in-store promotion.
- Sync branches after major configuration updates.
- Restrict delete permissions to senior administrators.
Add / Edit Branch
The Add Branch page allows administrators to create a new branch or update the details of an existing branch. A branch represents a physical location where services are provided.
All branch-specific information such as contact details, address, and operational settings can be configured here.
Company
This field displays the company that the branch belongs to.
It helps identify which organization the branch is associated with. In most cases, this value is already predefined and does not require changes.
Name
Enter the name of the branch or location. This name will appear in:
- Appointment bookings
- Invoices
- Notifications
- Reports
Choose a clear and recognizable name so customers can easily identify the location.
Contact Name
Enter the name of the main contact person for the branch. This could be:
- Branch manager
- Receptionist
- Front desk staff
Providing a contact name helps staff and customers know who is responsible for communications related to this branch.
Contact Number
Enter the primary phone number for the branch. Customers may use this number for:
- Booking enquiries
- Service information
- Appointment assistance
Ensure the number is correct and accessible during business hours.
Enter the official email address for the branch. This email is used for:
- Communication related to bookings
- System notifications
- Customer correspondence
Use a professional and actively monitored email address.
Password
This field allows you to set or update the login password for the branch account if the branch has its own system access. Ensure the password is secure and shared only with authorized staff members.
Full Address
Enter the complete physical address of the branch. This address may appear on:
- Customer communications
- Booking confirmations
- Official documents
Providing an accurate address helps customers easily locate the branch.
Latitude
Enter the latitude coordinate of the branch location. Latitude helps the system identify the exact geographical position of the branch on maps and supports location-based services.
Longitude
Enter the longitude coordinate of the branch location. Together with the latitude value, this ensures the branch location is correctly placed on maps within the system.
Status for Admin
This option determines whether the branch is available for administrative management.
Active – Administrators can access and manage the branch.
Inactive – The branch will not appear in administrative tools, management options, or reports.
Enable Online
This setting controls whether the branch is available for online customer bookings.
Active – Customers can book appointments online for this branch.
Inactive – The branch will not appear in the online booking system.
Status
This setting controls whether the branch is active across the system.
Active – The branch can be used for appointments, staff assignments, and reporting.
Inactive – The branch is disabled and cannot be used in the system.
Action Buttons
Cancel Click Cancel to discard any changes made on this page and return to the previous screen without saving.
Submit Click Submit to save the branch information.
Once submitted, the branch will be created or updated based on the details entered.