Customer Management
The Customer Management page allows you to view, manage, and organize all customer records in one place. It provides tools for searching, filtering, exporting, importing, and performing quick actions on customer data.
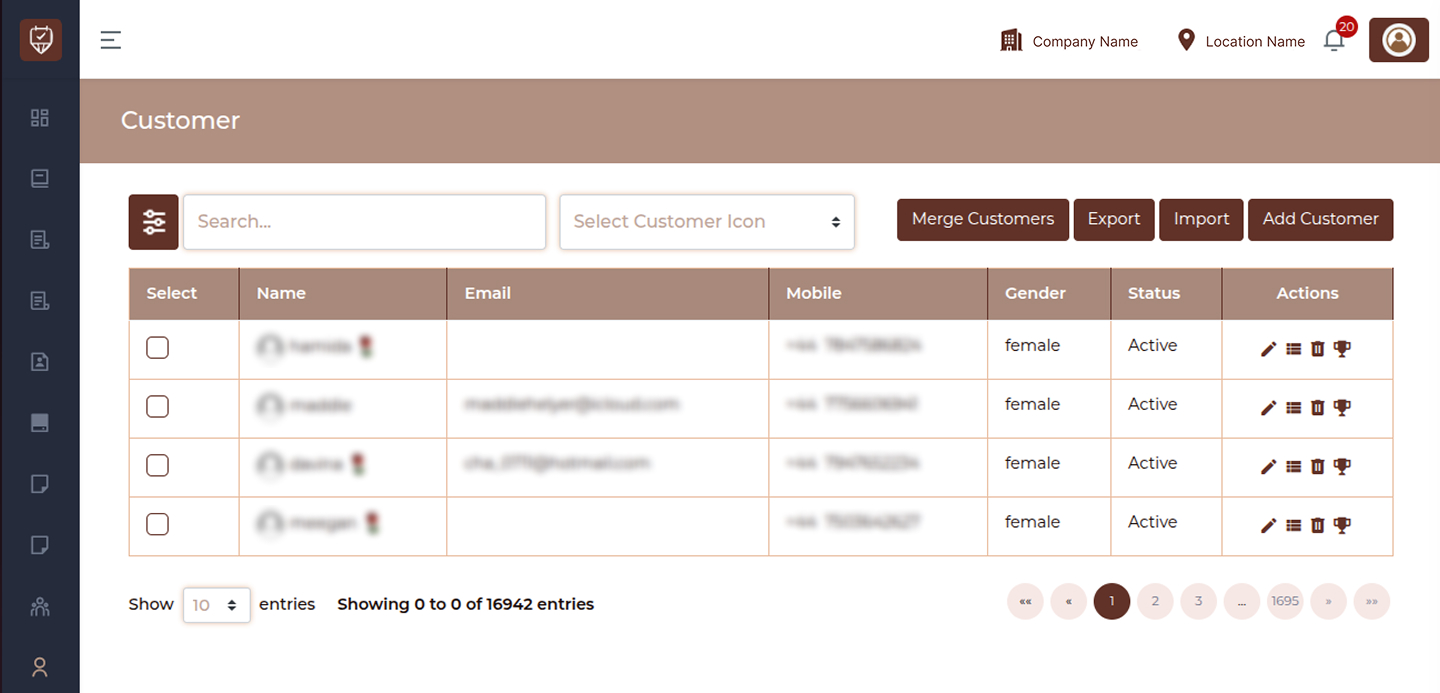
Overview
This page displays a structured list of all customers along with their key details.
Search Bar
Use the search field to quickly find customers by:
- Name
- Mobile number
Typing in the search box will instantly filter the results.
Customer Icon Filter (Quick Filter)
Located next to the search bar.
This dropdown allows you to filter customers based on assigned categories or icons, such as:
- VIP
- Regular
- New
This helps in quickly segmenting customers without opening advanced filters.
Merge Customers
Combine duplicate customer records into a single profile.
Useful when:
- The same customer is added multiple times
- Data needs to be consolidated
Export
Download the customer list.
- Backup
- Reporting
- External analysis
Import
Upload customer data in bulk.
Used for:
- Data migration
- Adding large customer lists
Add Customer
Create a new customer profile manually.
Customer Table Columns
The main table shows the following information:
Select
Checkbox used to select one or multiple customers for bulk actions.
Name
Displays the customer’s full name.
Customer’s registered email address.
Mobile
Customer’s contact number with country code.
Gender
Indicates the customer’s gender.
Status
Shows whether the customer is:
- Active – Currently active
- Inactive – Not active
Actions
Each row includes quick action icons such as:
- Edit customer details
- Delete customer
- View additional options or history
Customer Filter Panel
The Customer Filter panel provides advanced filtering options to target specific customer groups based on behavior, usage, and booking data.
Click the filter icon next to the search bar to open the advanced filter popup.
Customer Icon
Select a customer category or icon to filter customers by their assigned label.
Examples:
- VIP
- Regular
- New
Service Type
Choose one or more service categories to filter customers based on the types of services they have booked.
This helps identify customers by service category usage.
Services
Select specific services to filter customers who have booked those services.
Useful for:
- Targeted promotions
- Service-specific campaigns
Un-used Service Type
Select service categories that the customer has never booked.
This is useful to:
- Identify gaps in service usage
- Plan upsell opportunities
Un-used Services
Choose specific services that customers have not used yet.
Helpful for:
- Cross-selling
- Personalized marketing campaigns
Package
Select a package to filter customers who have purchased or are associated with a specific package.
Start Date
Select the start date to filter customers with bookings from this date onward.
End Date
Select the end date to filter customers with bookings up to this date.
Subscribe to Notifications
Enable this option to target customers who are subscribed to notifications.
Booking Status
Select the booking status to filter customers.
Example:
Active : Targets customers who currently have bookings within the selected date range
This is especially useful when sending offers or reminders to active customers only.
Filter Actions
Save : Apply the selected filters and update the customer list.
Close : Close the filter panel without applying changes.
Best Practices
- Keep customer data updated
- Use filters for targeted campaigns
- Avoid duplicate entries by merging records
- Regularly export data for backup
- Use unused service filters for upselling
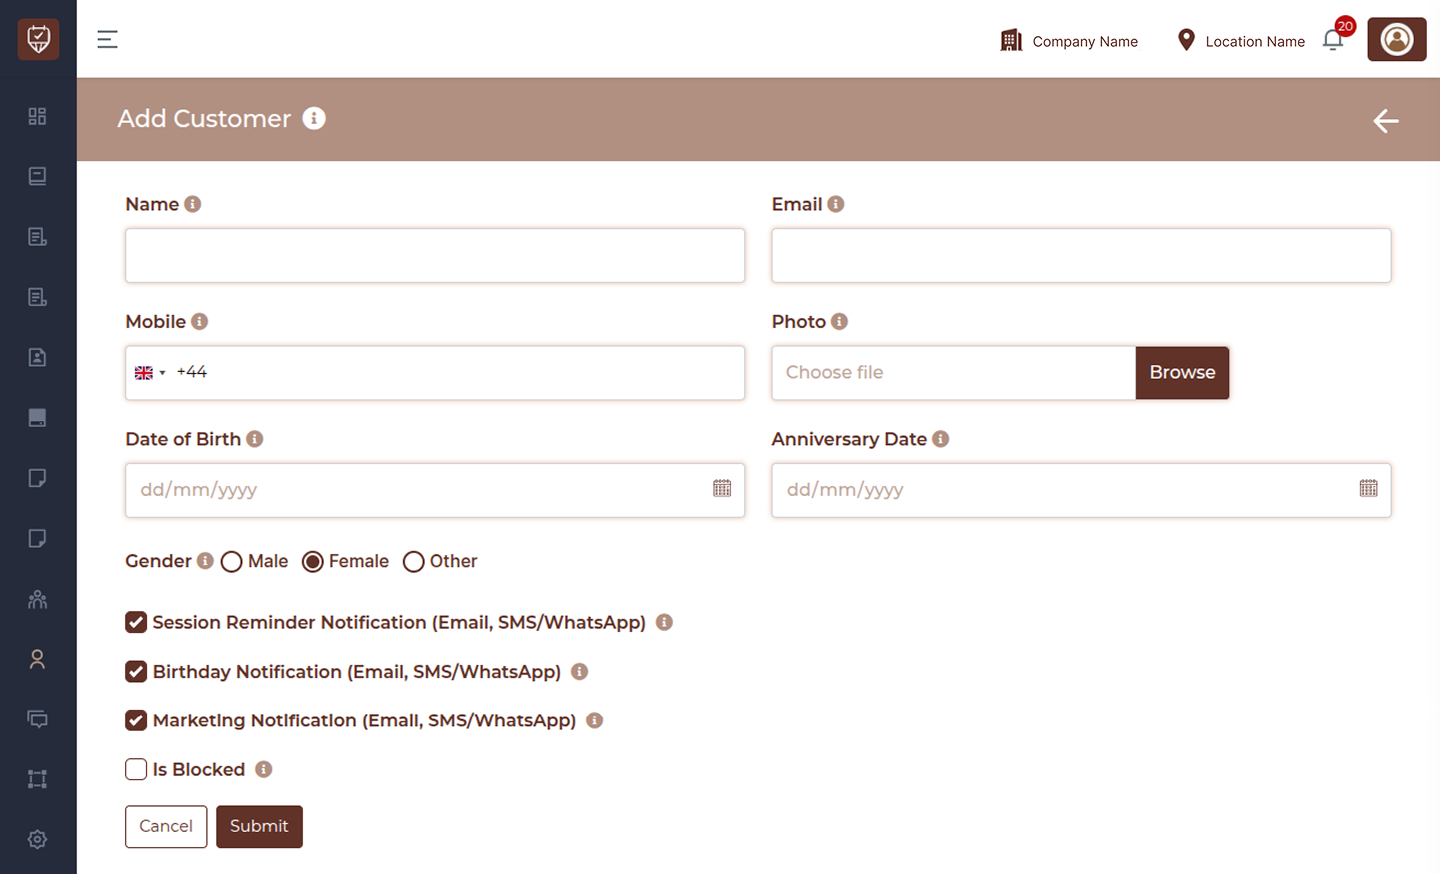
Add / Edit Customer
The Add / Edit Customer page allows you to create and manage customer profiles. This information is used for bookings, communication, reminders, and marketing activities.
Use this form to store essential customer details and control how they receive notifications.
Overview
This page enables you to:
- Create a new customer profile
- Update existing customer details
- Configure communication preferences
- Manage booking eligibility
Add/Edit Customer
This section is used to store all relevant customer information for future interactions.
Back Button
Located at the top-right corner.Clicking this will return you to the customer listing page without saving any changes.
Name
Enter the full name of the customer. This helps in identifying the customer across bookings, invoices, and reports.
Enter the customer’s email address. This is used for:
- Sending invoices
- Booking confirmations
- Promotional offers
- Notifications
Mobile Number
Enter the customer’s mobile number. This is used for:
- SMS notifications
- WhatsApp communication
- Appointment reminders
Country Code
Select the appropriate country code before entering the mobile number. This ensures correct delivery of SMS and WhatsApp messages.
Photo Upload
Upload a profile image for the customer. This helps staff visually identify customers during visits.
Date of Birth
Select the customer’s date of birth.
Used for:
- Sending birthday wishes
- Offering birthday promotions
- Personalizing customer experience
Anniversary Date
Select the anniversary date (if applicable).
Used for:
- Sending anniversary greetings
- Offering special promotions
Gender
Select the customer’s gender. Options typically include:
- Male
- Female
- Other
This helps with personalization and reporting.
Notification
These options control how the customer receives communication.
Session Reminder Notification
Enable this option to send appointment reminders via:
- SMS
Helps reduce missed appointments.
Birthday Notification
Enable to automatically send:
- Birthday wishes
- Special offers
Improves customer engagement.
Marketing Notification
Enable to allow:
- Promotional messages
- Campaign updates
- Offers and discounts
Useful for marketing and retention.
Is Blocked
Enable this option to restrict the customer.
Blocked customers:
- Cannot make bookings
- Will not receive communications
Useful for managing problematic or restricted users.
Actions
Submit : Click Submit to save the customer details.
- Creates a new customer (Add mode)
- Updates existing details (Edit mode)
Cancel : Click Cancel to exit the page without saving any changes.
Best Practices
- Always enter accurate contact details
- Enable reminder notifications to reduce no-shows
- Use marketing notifications carefully to avoid spamming
- Upload profile images for better identification
- Keep customer data updated regularly
Customer Bookings
The Customer Bookings page allows you to view and track all appointments associated with a specific customer. It provides detailed booking history along with filtering options to quickly find relevant records.
This page helps staff monitor customer activity, service usage, and appointment status.

Overview
This page displays:
- Customer details
- Booking history
- Service-wise and date-wise filtering options
Name
Displays the customer’s full name.
Shows the customer’s registered email address.
Mobile
Displays the customer’s contact number with country code.
From Date
Select a start date to view bookings from that date onward.
Useful for:
- Checking recent activity
- Filtering by a specific time period
To Date
Select an end date to view bookings up to that date. Used together with From Date for custom date ranges.
Service
Select a specific service to filter bookings.
- This is a dropdown field
- Displays available services
- Helps track service-specific bookings
Booking Table
The main table displays all bookings based on selected filters.
Service
Shows the name of the booked service.
Location
Displays the branch or location where the service was booked.
Therapist
Shows the assigned staff member for the service.
Date
Displays the appointment date.
Time
Shows the scheduled appointment time.
Status
Indicates the booking status, such as:
- Confirmed
- Completed
- Cancelled
- Pending
No Data State
If no bookings match the selected filters, the table will display:
“No Data Found”
This means:
- No bookings exist for the selected criteria
- Or the customer has no booking history
Best Practices
- Use date filters for faster results
- Check booking status before taking actions
- Monitor repeat services for upselling
- Use data for personalized marketing
Customer Rewards
The Customer Rewards page allows you to manage and track reward points assigned to a customer. It helps in maintaining loyalty programs, tracking reward history, and encouraging repeat visits through incentive-based engagement.
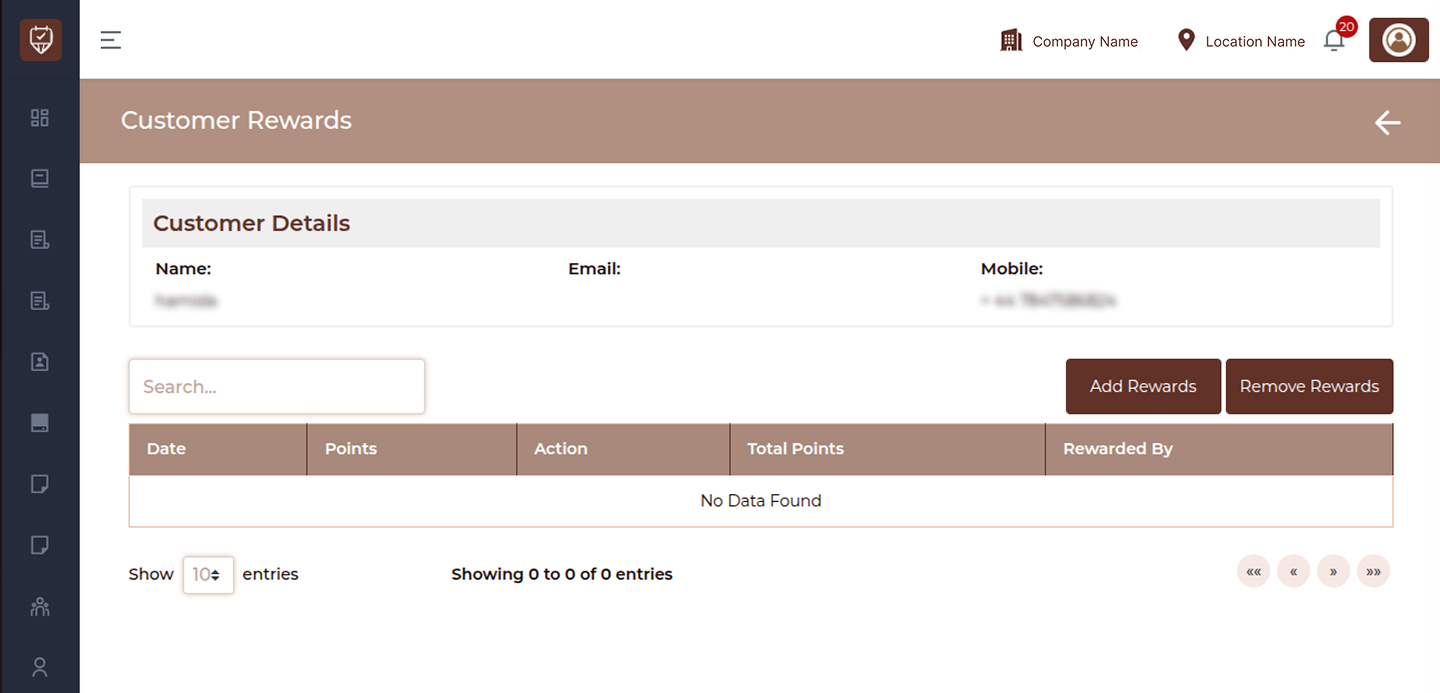
Overview
This page provides:
- Customer summary details
- Reward points history
- Options to add or remove reward points
Name
Displays the customer’s name.
Shows the registered email address.
Mobile
Displays the contact number with country code.
Search Bar
Use the search field to quickly locate specific reward entries. You can search by:
- Date
- Action type
- Points value
This helps in quickly finding specific reward transactions.
Action
Located on the top-right of the page.
Add Rewards
Use this button to assign reward points to the customer.
Typical use cases:
- Loyalty rewards
- Promotional offers
- Manual adjustments
Remove Rewards
Use this button to deduct reward points from the customer.
Typical use cases:
- Redemption of points
- Corrections or adjustments
Rewards Table
The main section displays a detailed history of reward transactions.
Date
Shows the date when the reward activity occurred.
Points
Displays the number of points added or deducted.
Action
Indicates the type of transaction.
Examples:
- Added
- Redeemed
- Adjusted
Total Points
Shows the cumulative reward points balance after each transaction.
Rewarded By
Displays the staff member or system responsible for the reward action.
Best Practices
- Add rewards consistently based on business rules
- Clearly track reward adjustments
- Monitor total points regularly
- Use rewards to improve customer retention