Products Management
Overview
The Products page is the central place to manage inventory, pricing, stock movement, and product-related actions. It allows you to search, filter, update, and control products efficiently from a single interface.
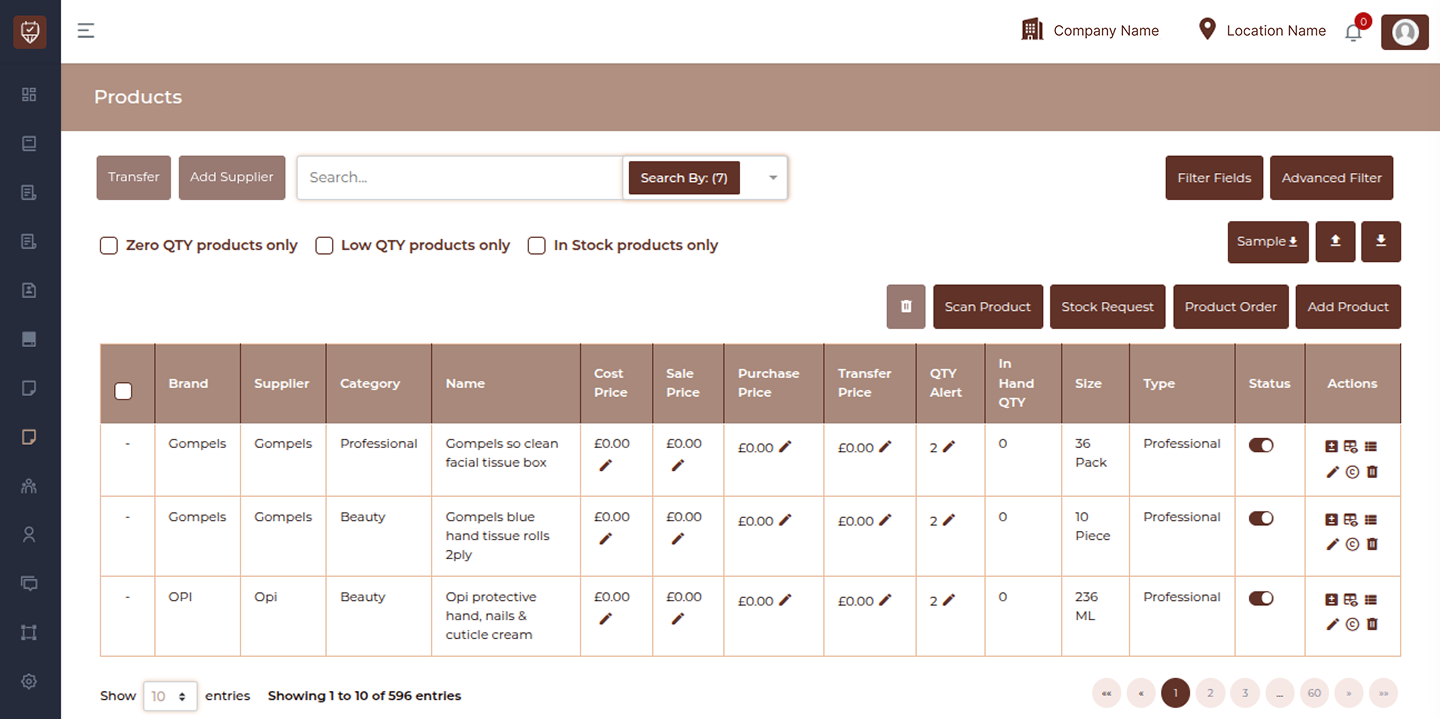
Main Product List Page
- View all products in a table format
- Update prices directly
- Manage stock
- Filter and search products
- Perform bulk actions
- Access detailed product tools
Bulk Selection Actions
When you select one or more products using checkboxes, additional actions become available.
Transfer Products
Moves selected products to another location.
- Select destination location
- Scan barcode for quick selection
- Adjust transfer quantity
- Confirm transfer
Add Supplier
Assigns or updates supplier for selected product(s).
- Select supplier from dropdown
- Save assignment
Basic Search
Search products using keyword input.
Quantity Filters
- Show only zero quantity products
- Show low stock products
- Show available stock
Filter Fields (Column Control)

Customize which columns are visible in the table.
- Price fields
- Quantity fields
- Product attributes
- Status fields
Advanced Filter
Filter products using multiple conditions.
- Product code
- Category
- Brand
- Supplier
Product Tools (Top Right Actions)
Scan Product
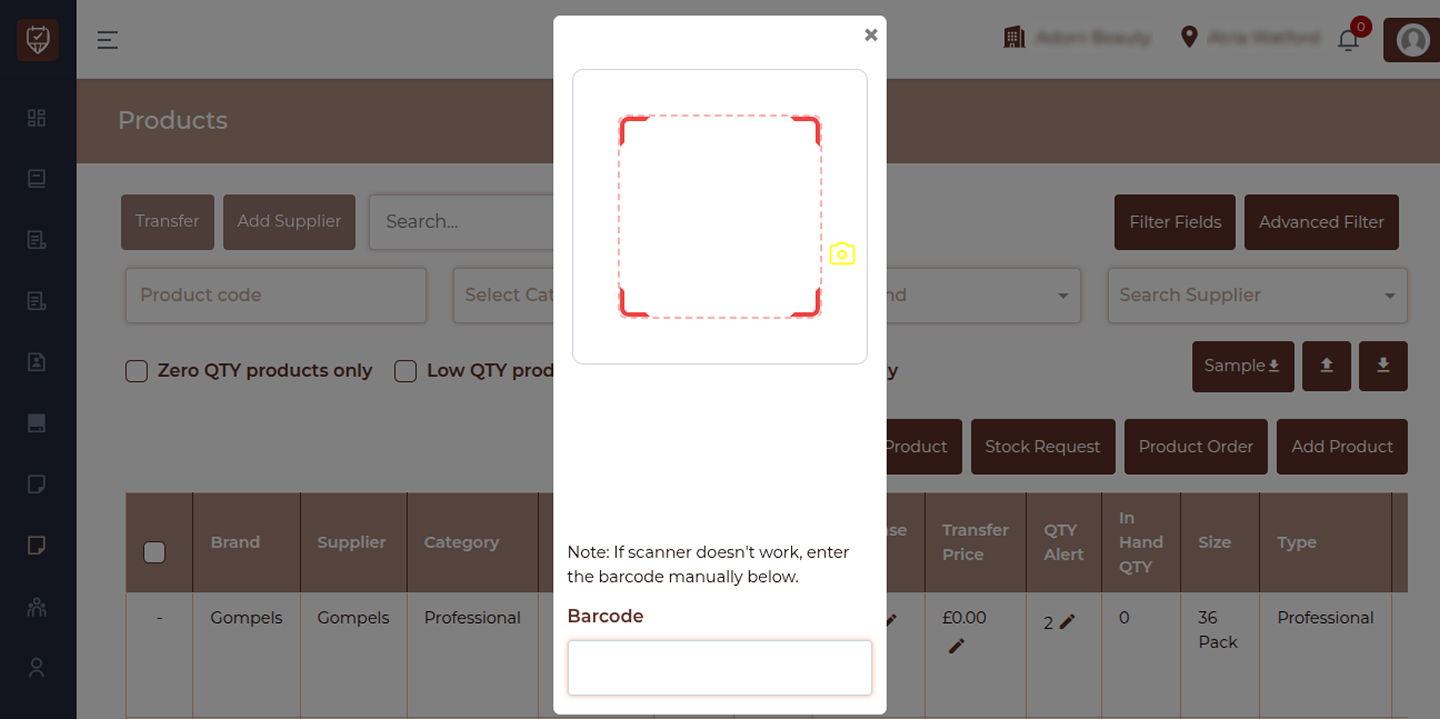
- Scan product barcode using scanner
- Or manually enter barcode
- Quickly locate product
Stock Request
- Create stock request entries
- Request products for restocking
- Track request details
Product Order
- Create and manage product purchase orders
- Track ordered items
- Manage incoming stock
Add Product
- Create new product
- Define product details
- Set pricing and stock
- Configure attributes
Inline Price Editing
Clicking on any price field opens a quick edit popup.
- Cost Price → Internal cost of product
- Sale Price → Selling price
- Purchase Price → Buying price
- Transfer Price → Internal transfer cost
Row Actions (Per Product)
Each product row contains action icons.
Manage Stock
- Add or remove stock
- Update pricing
- Set quantity alerts
- Add reason for adjustment
Key Fields:
- Adjustment Type → Add / Remove stock
- Quantity → Amount to update
- Size → Unit type
- Cost/Sale/Purchase Price → Pricing
- Minimum Alert → Low stock warning
- Reason → Explanation for change
View Stock
- Available quantity
- Volume / size
- Expiry information
View Transactions
- Stock movement history
- In / Out / Removed entries
- Date and reason
Other Actions
Edit : Opens product edit page
Copy : Creates duplicate product
Delete : Removes product permanently
Add / Edit Product
Overview
The Edit Product page allows you to manage all details related to a product, including identification, categorization, tax settings, visibility, and stock management. This page ensures that your product data is accurate, organized, and ready for sales and inventory tracking.
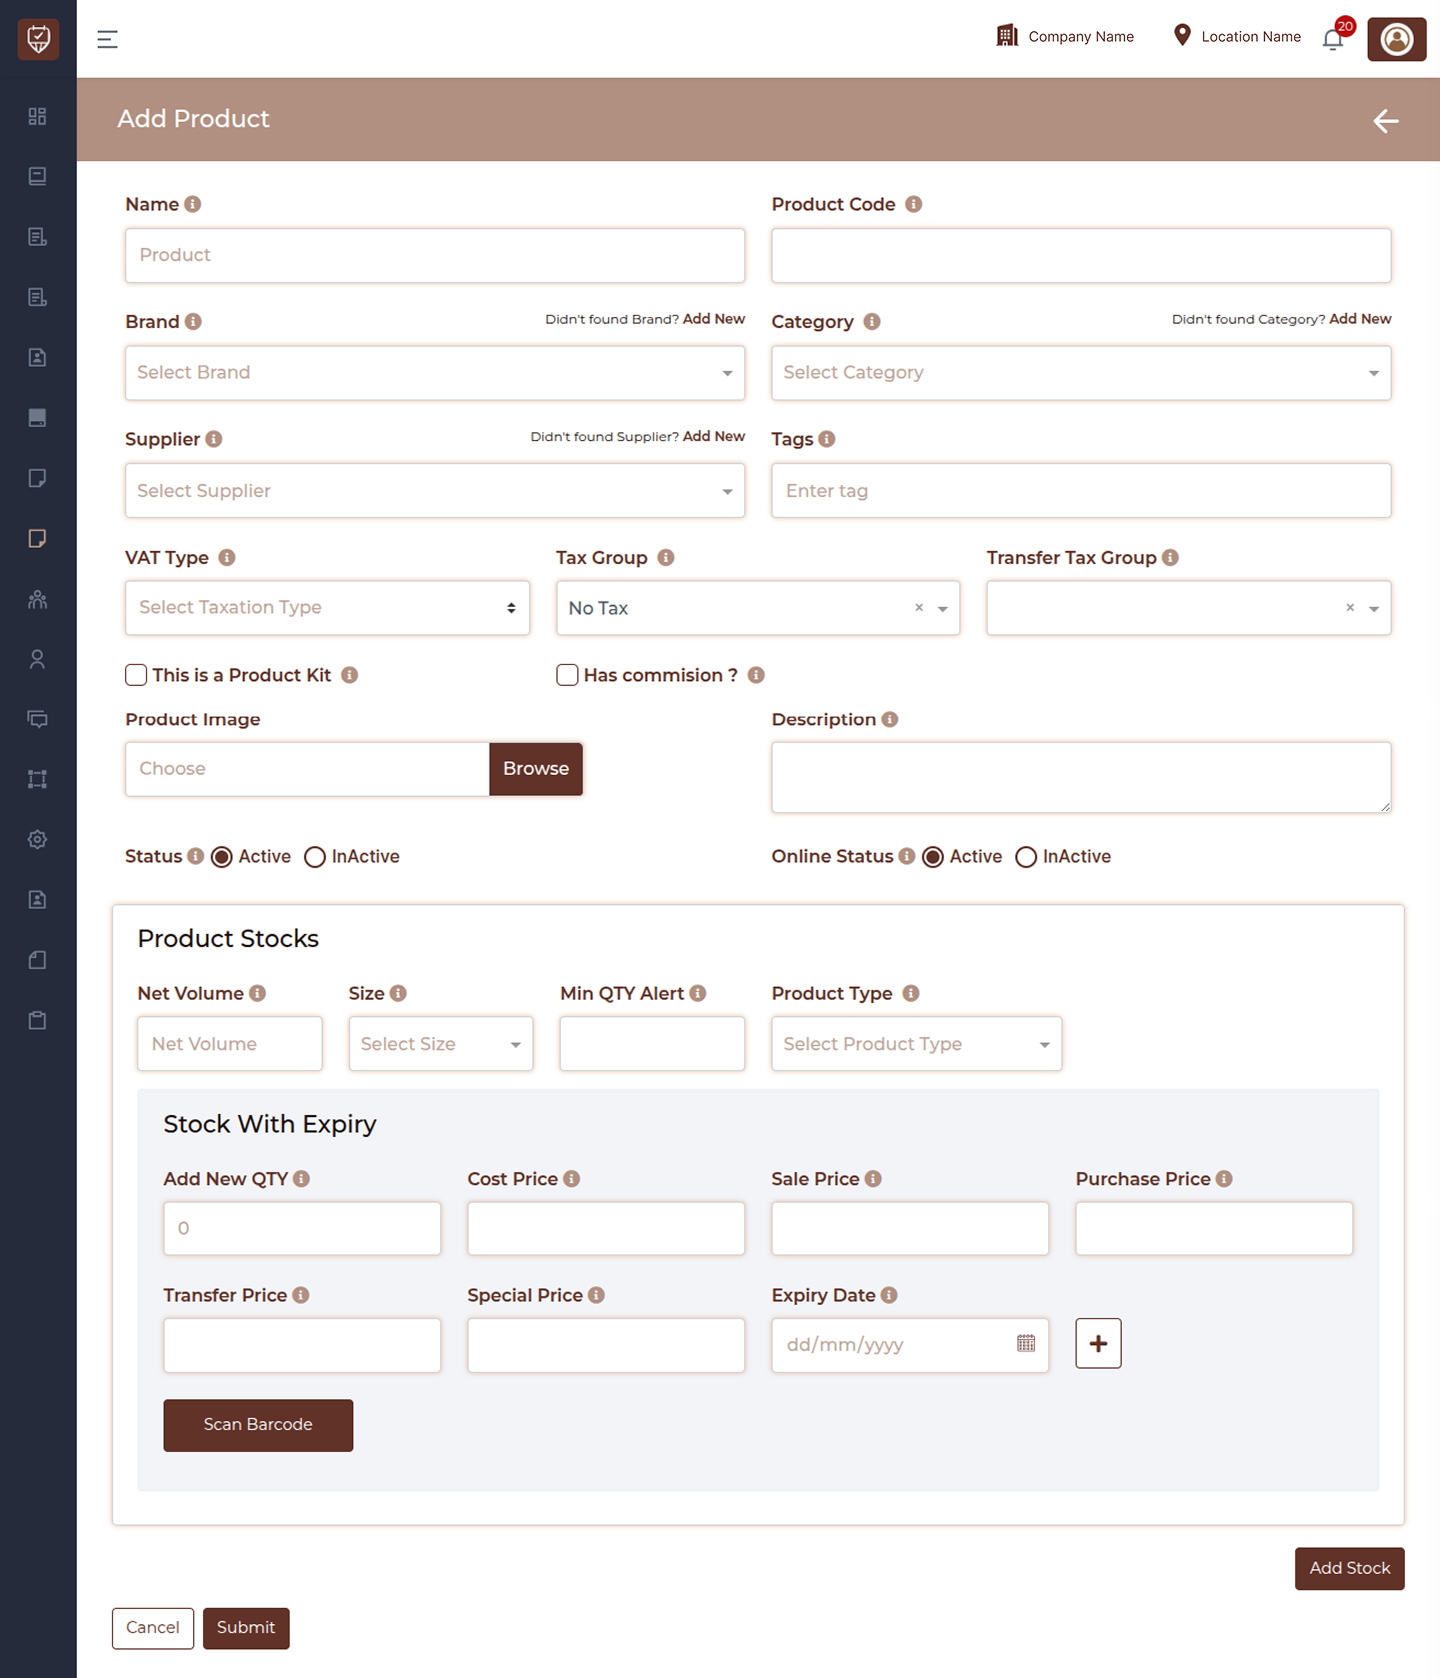
Basic Product Information
- Name – Enter the official name of the product. This name appears across the system, including invoices, stock lists, and sales screens.
- Product Code – Assign a unique identifier or SKU for the product. This helps in tracking inventory, barcode usage, and quick searches.
- Brand – Select the brand associated with the product. This helps organize products and improves search and reporting.
- Category – Assign the product to a specific category. Categorization helps in organizing inventory and generating structured reports.
- Supplier – Select the supplier providing the product. This helps track purchasing and supplier-related data.
- Tags – Add keywords to make the product easier to search within the system.
Tax & Compliance Settings
- VAT Type – Define the tax structure applicable to the product. This ensures proper tax handling during billing.
- Tax Group – Select the tax rate that should apply to the product. This ensures accurate calculation during transactions.
- Transfer Tax Group – Used when transferring stock between locations, ensuring correct tax handling for internal movements.
Product Configuration
- This is a Product Kit – Enable this option if the product is a bundle of multiple items. This allows grouping and managing combined products.
- Has Commission – Enable this if the product should generate staff commission during sales.
- Product Image – Upload an image to visually identify the product. Useful for display and recognition.
- Description – Provide additional details such as usage instructions, ingredients, or notes.
Status & Visibility
- Status (Active / Inactive) – Controls whether the product is available for operations such as sales and stock management.
- Online Status (Active / Inactive) – Determines whether the product is visible in online systems such as booking or online store.
Product Stock Settings
This section defines how the product is tracked in inventory.
- Net Volume – Specify the quantity or unit size of the product (e.g., ml, grams, or pieces).
- Size – Select the size or variant of the product.
- Min QTY Alert – Set a threshold for low stock alerts. The system notifies you when stock falls below this value.
- Product Type – Define the type of product (e.g., retail, consumable, or service-related).
Stock With Expiry
This section allows you to manage stock batches with pricing and expiry tracking.
- In Hand Quantity – Displays the current available stock for the selected configuration.
- Add New Quantity – Enter the quantity of stock being added.
- Cost Price – Enter the cost per unit. Used for profit and valuation calculations.
- Sale Price – Set the selling price for customers.
- Purchase Price – Record the price at which the product was purchased.
- Transfer Price – Used for internal stock transfers between locations.
- Special Price – Define promotional or discounted pricing if applicable.
- Expiry Date – Select the expiry date for the stock batch.
- Add (+) Button – Adds the entered stock batch along with pricing and expiry details.
- Scan Barcode – Use barcode scanning to quickly input product or batch information.
- Add Stock – Allows adding multiple stock batches with different pricing or expiry details.
Final Actions
- Submit – Save all product details and apply changes across the system.
- Cancel – Discard all changes and exit the page.
How to Use
- Enter complete product details for accurate identification
- Assign correct category, supplier, and tags for better organization
- Configure tax settings properly for compliance
- Maintain stock details with correct pricing and expiry
- Use alerts to prevent stock shortages
- Keep status active only for usable products
Product Stock Request Management
The Product Stock Request Management page allows you to view, track, and manage all stock requests created across locations. It provides a clear overview of requested items, their status, and related actions.
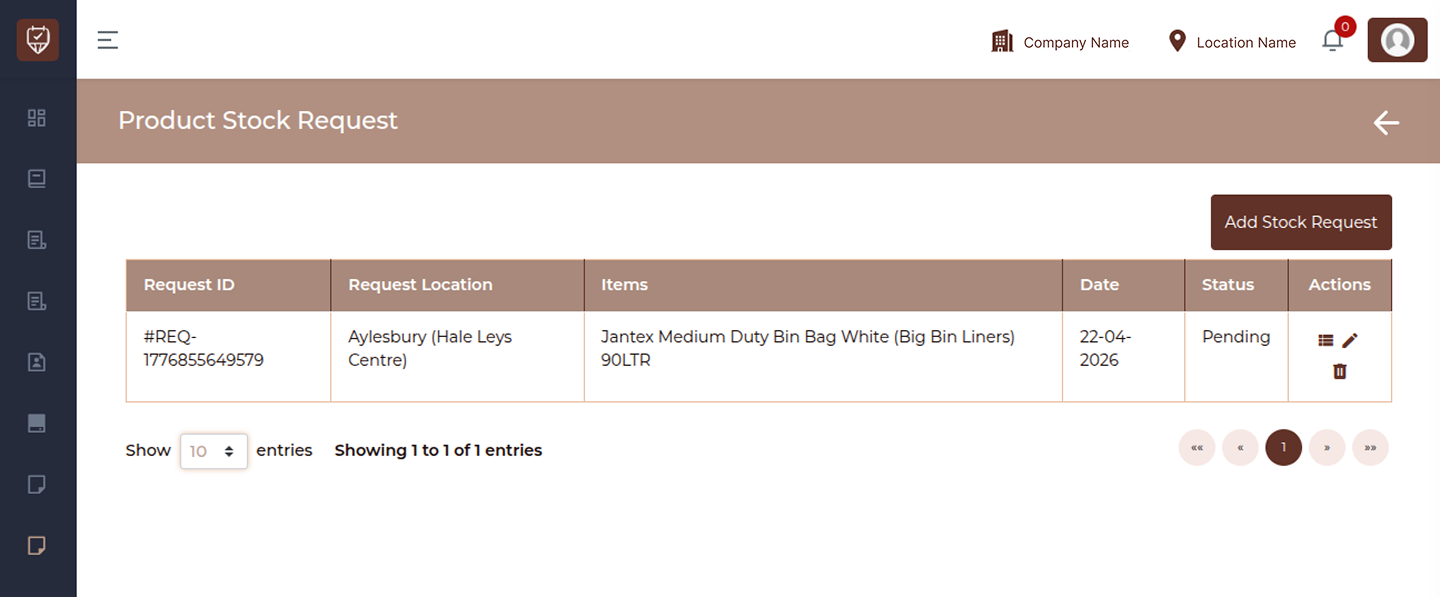
Add Stock Request Button
Click this button to create a new stock request.This will open the stock request form where you can select products, define quantities, and submit the request.
Stock Request Table
The table displays all stock requests along with key details:
- Request ID – Displays a unique identifier for each stock request. This helps in tracking and referencing specific requests.
- Request Location – Shows the location or branch where the stock has been requested.
- Items – Indicates the number of items included in the request. This gives a quick summary of how many products are part of each request.
- Date – Displays the date when the stock request was created.
- Status – Shows the current status of the request. This may include states such as pending, approved, completed, or rejected depending on the workflow.
- Actions – Provides options to manage each request. You may be able to view details, edit, or perform other actions depending on the request status.
How to Use
- Click Add Stock Request to create a new request
- Review request details using the table columns
- Monitor the status of each request for tracking
- Use actions to manage or view individual requests
- Navigate through pages if there are multiple records
Add / Edit Product Stock Request
Overview
The Add Product Stock Request page allows you to request stock from another location or department. It helps ensure that required products are transferred efficiently based on availability and demand.
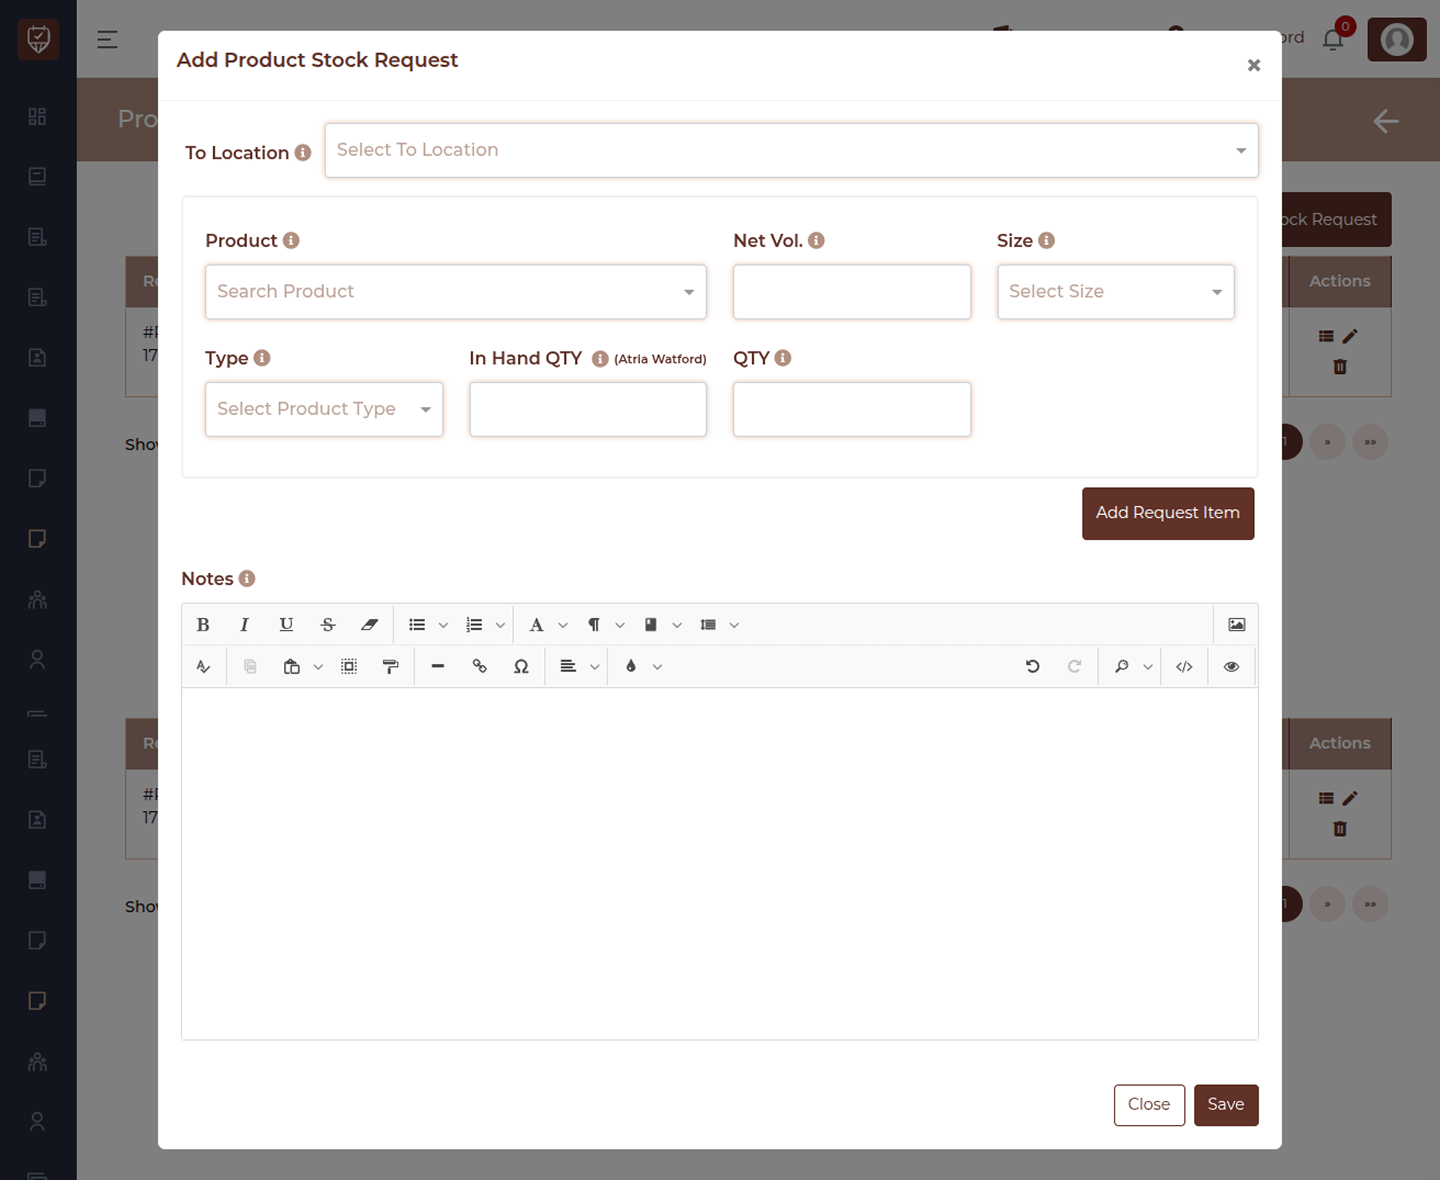
Stock Request Information - To Location
Select the destination where the requested stock should be delivered. This defines the branch or department that requires the items.
Product Details
- Product – Search and select the product you want to request. You can type the product name or choose it from the dropdown list.
- Net Volume – Enter the volume or unit quantity for the selected product (for example, ml, grams, or pieces). This helps define the exact unit specification of the item.
- Size – Choose the size or variant of the product. This is useful when the same product is available in multiple sizes or packaging options.
- Type – Select the product category or type. This helps classify the product, such as retail, consumable, or any predefined category.
Quantity Information
- In Hand Quantity – Displays the current stock available at the requesting location. This helps you decide whether a request is necessary.
- Quantity (QTY) – Enter the number of units you want to request. Ensure the quantity reflects actual requirements to maintain accurate stock flow.
Add Request Item
Click this button to add the selected product along with its details to the request list.You can repeat this process to include multiple items in a single request.
Notes
Use this section to add any instructions or comments related to the request. This can include urgency, handling instructions, or reasons for the request.
Final Actions
- Save – Submit the stock request for processing. Once saved, the request is sent to the relevant team or location for review and fulfillment.
- Close – Exit the form without saving any changes.
How to Use
- Select the destination location first
- Add products with correct size, type, and quantity
- Review current stock before requesting
- Add multiple items if needed
- Include notes for clarity or special handling
Product Orders Management
Overview
The Product Orders Management page allows you to create, track, and manage all product purchase orders. It helps you monitor incoming stock, manage supplier orders, and keep track of order status and costs.

Search Bar
Use the search field to quickly find an order by entering the order ID, supplier, or item details. The results update dynamically as you type.
Action Buttons
- Orders Received – Use this option to view or manage orders that have already been received. This helps track completed deliveries and update stock accordingly.
- Add Smart Order – Create a system-generated order based on stock levels and minimum quantity alerts. This helps automate reordering and prevents stock shortages.
- Add Order – Click this button to manually create a new product order. You can select items, define quantities, and submit the order for processing.
Product Orders Table
The table displays all product orders along with essential details:
- Order ID – Shows a unique identifier for each order. This helps in tracking and referencing orders.
- Supplier – Displays the supplier associated with the order.
- Items – Lists the products included in the order along with their details.
- Date – Indicates when the order was created.
- Price – Shows the total value of the order.
- Status – Displays the current status of the order, such as pending or completed.
- Actions – Provides options to manage each order. Common actions may include viewing order details, editing, updating status, or deleting the order.
How to Use
- Use the search bar to find specific orders quickly
- Create new orders using Add Order or Smart Order options
- Track order progress using the status column
- Review supplier and item details before processing
- Manage orders using available action options
Product Order Received
Overview
The Product Order Received page is used to confirm and record items received against a purchase order. It ensures that delivered quantities are verified, discrepancies are tracked, and stock levels are updated accurately.
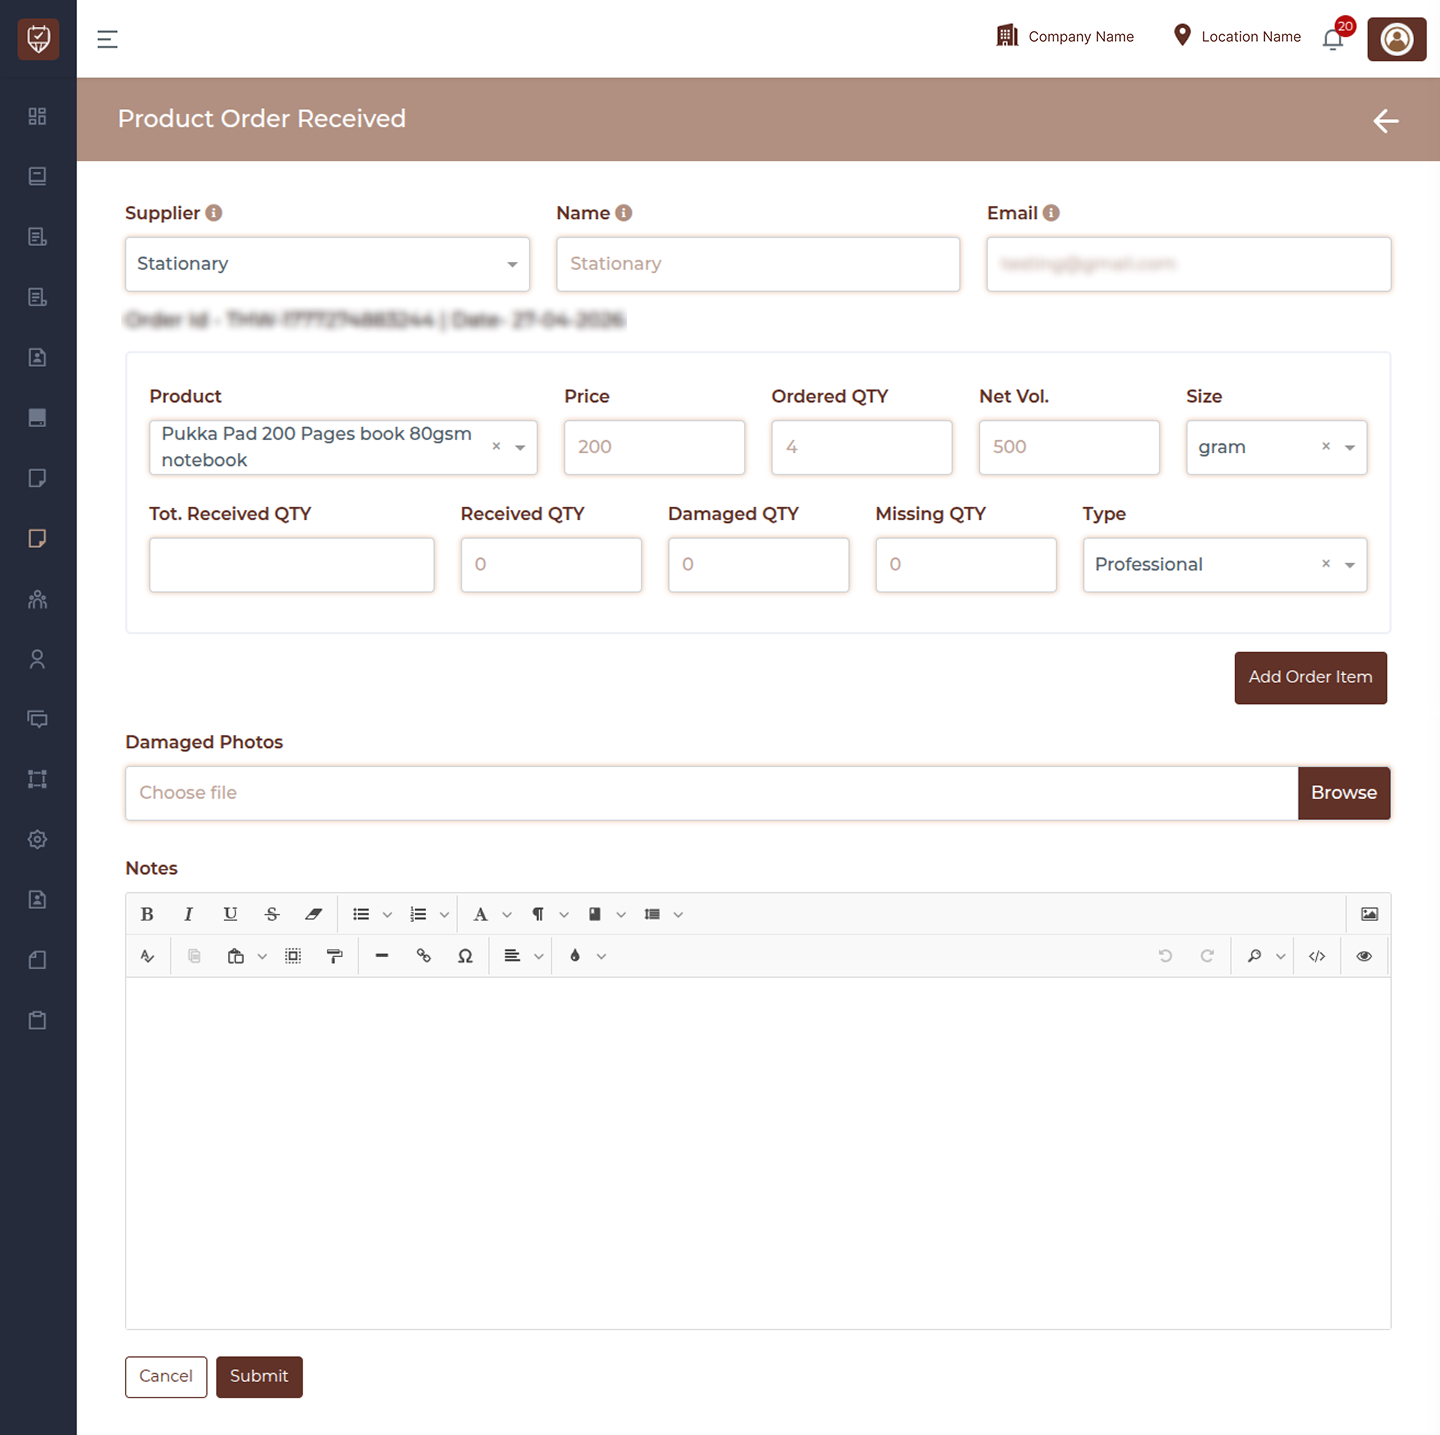
Supplier Information
- Supplier – Select the vendor who delivered the order. Choosing a supplier loads the related order details and ensures the received items are linked correctly.
- Name – Displays the supplier’s name. This is usually auto-filled after selecting the supplier to help confirm the correct vendor.
- Email – Shows the supplier’s registered email address for verification and reference.
Order Details
Once a supplier is selected, the system loads the relevant order information:
- Order ID and Date
Displays the unique order reference and the date the order was created. This helps identify the exact order being processed.
Product Details
Each product in the order is displayed with its corresponding information:
- Product – Shows the item included in the order. This is pre-filled based on the selected order.
- Price – Displays the price per unit for the product.
- Ordered QTY – Indicates the quantity that was originally ordered.
- Net Volume – Represents the unit measurement or volume per item.
- Size – Shows the selected size or variant of the product.
- Type – Indicates the product classification.
Quantity Verification
This section is used to validate the received stock:
- Total Received QTY – Displays the total number of items received so far for this product.
- Received QTY – Enter the number of items successfully received in good condition.
- Damaged QTY – Enter the quantity of items that arrived damaged.
- Missing QTY – Enter the number of items that were expected but not received.
- These fields help maintain accurate inventory and track discrepancies in deliveries.
- Add Order Item Button – Use this button to add multiple items from the order for processing. This allows you to record received quantities for each product individually.
- Upload Images – Upload photos of any damaged items received. This helps with documentation, supplier claims, and internal records.
- Notes Section – Use this area to add any comments or observations about the delivery. This may include details about delays, packaging condition, or discrepancies.
Final Actions
- Submit – Click Submit to confirm the received quantities. This will update inventory levels and mark the order (or items) as received.
- Cancel – Click Cancel to exit without saving any changes.
How to Use
- Select the supplier to load related orders
- Verify product details and ordered quantities
- Enter received, damaged, and missing quantities accurately
- Upload images if items are damaged
- Add notes for additional context if needed
- Submit to update stock and complete the receiving process
Product Order Detail
Overview
The Product Order Detail page provides a complete summary of a selected order. It allows you to review order information, supplier details, item breakdown, and total cost in a clear and organized format.
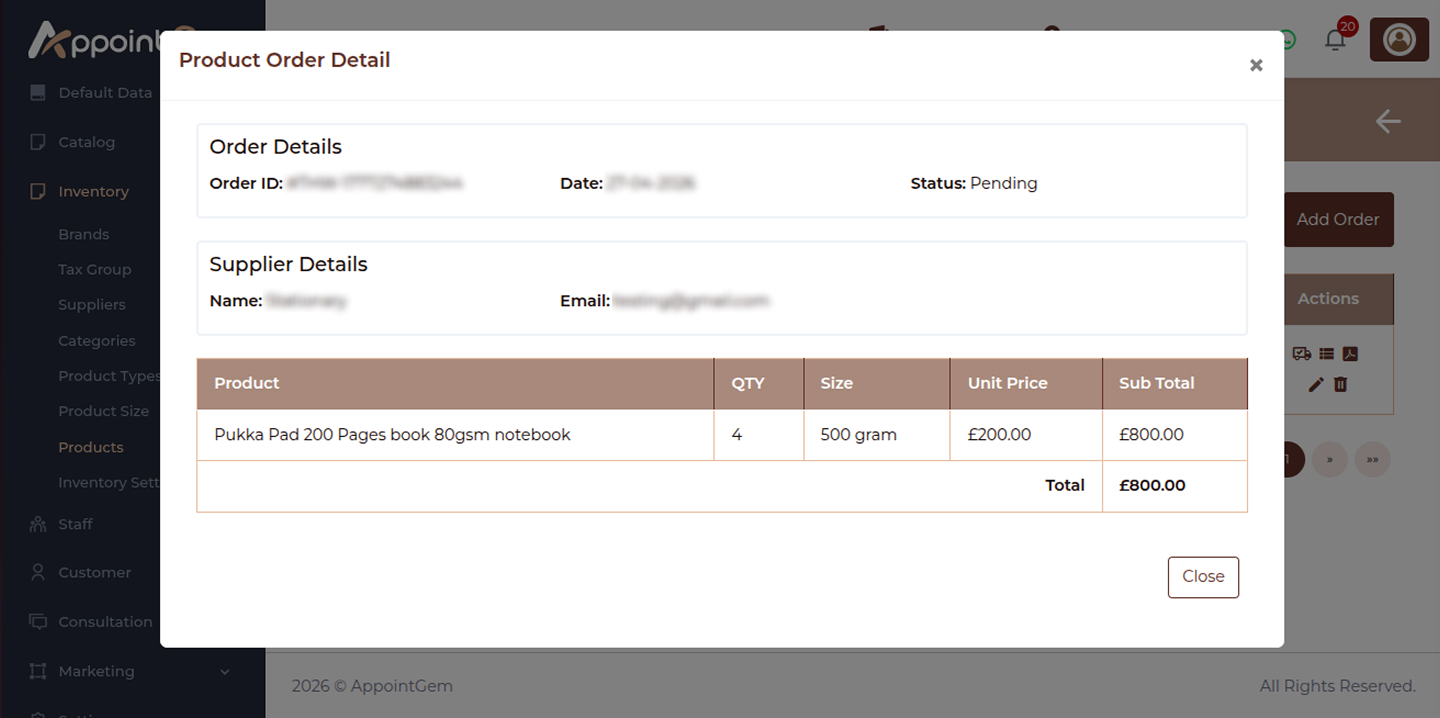
Order Details
This section displays key information about the selected order:
- Order ID – Shows the unique reference number assigned to the order. This helps identify and track the order within the system.
- Date – Displays the date when the order was created.
- Status – Indicates the current status of the order, such as Pending or Completed. This helps you understand whether the order has been processed or is still awaiting action.
Supplier Details
This section provides information about the vendor associated with the order:
- Name – Displays the supplier’s name.
- Email – Shows the supplier’s registered email address, which can be used for communication or verification purposes.
Product Breakdown
The table lists all items included in the order along with their details:
- Product – Displays the name of the ordered item.
- QTY – Indicates the quantity ordered for each product.
- Size – Shows the size or variant of the product.
- Unit Price – Displays the price per unit of the product.
- Sub Total – Represents the total cost for each product (Quantity × Unit Price).
- Order Total – At the bottom of the table, the Total section shows the overall cost of the entire order, calculated by summing all item subtotals.
Actions
- Close – Click Close to exit the order detail view and return to the previous screen.
How to Use
- Review the order ID and date to confirm the correct order
- Check the supplier details for verification
- Examine each product entry for quantity, size, and pricing accuracy
- Review the total amount for financial confirmation
- Close the window after reviewing the details
Add / Edit Product Order
Overview
The Add / Edit Product Order page allows you to create a new purchase order or update an existing one. This page helps you select a supplier, add products, define quantities and pricing, and include additional notes before finalizing the order.
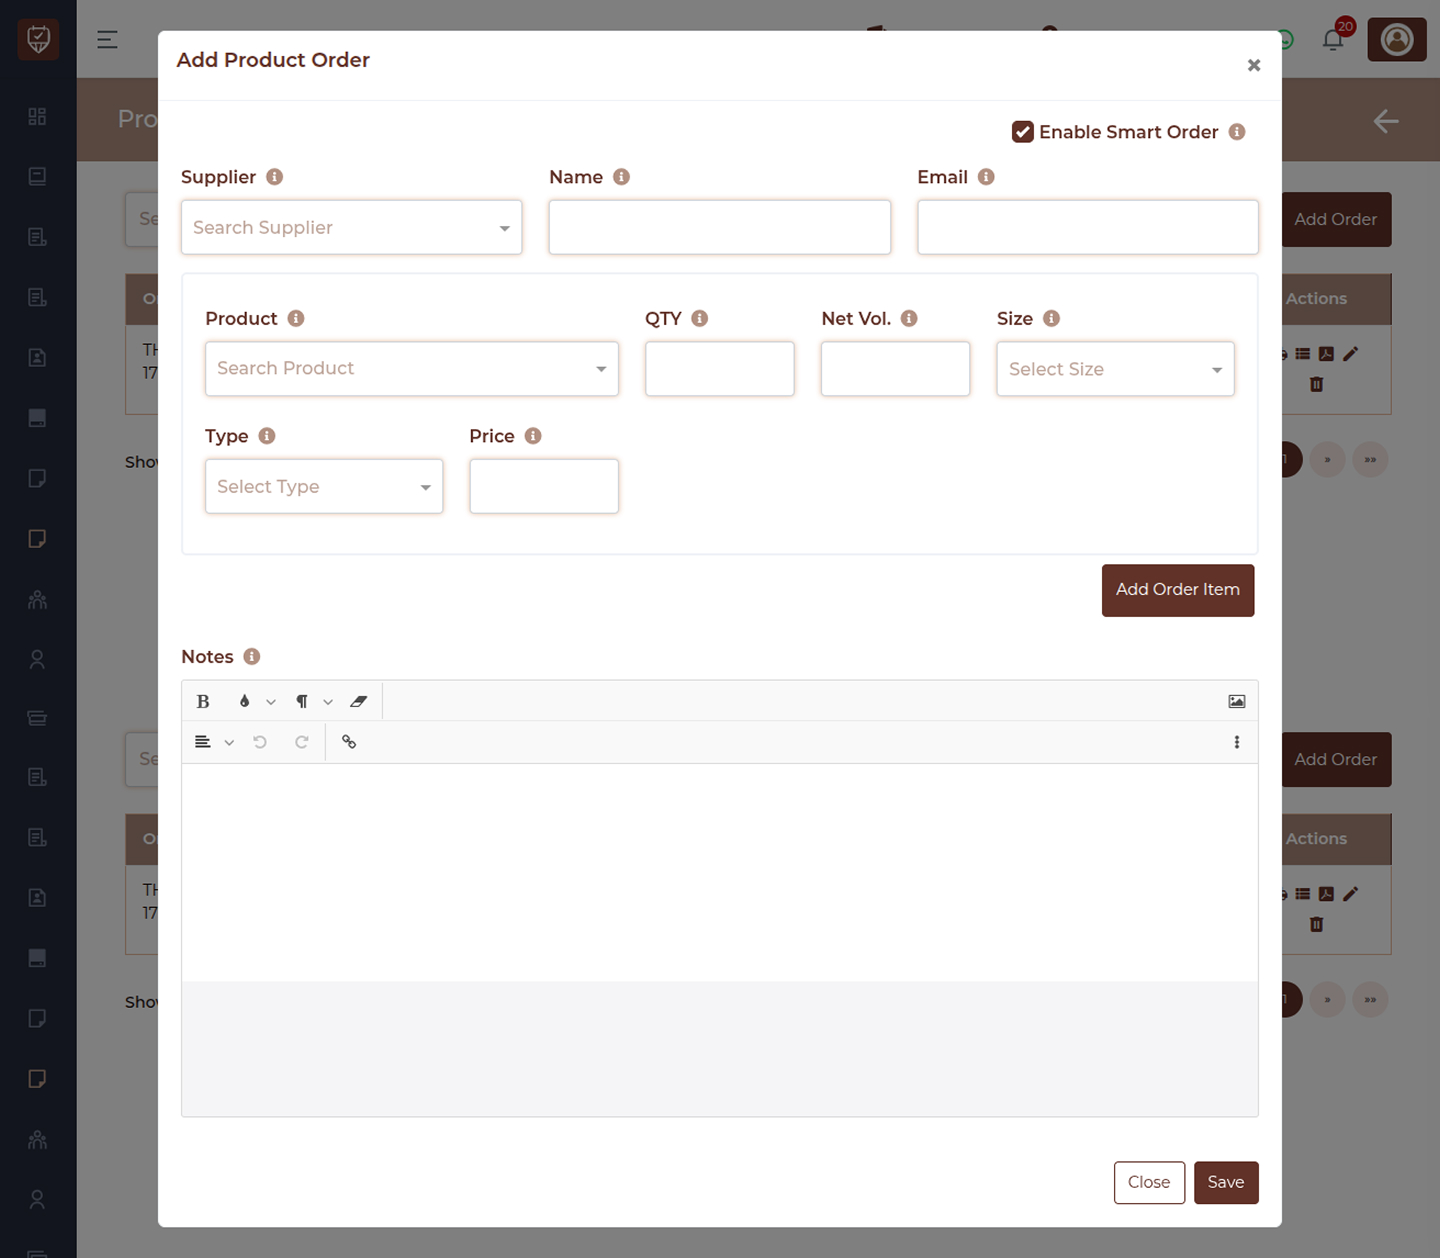
Supplier Information
- Supplier – Select the vendor from whom you want to place or update the order. Once selected, related supplier details are automatically populated.
- Name – Displays the supplier’s official name. This field is usually auto-filled to help confirm the selected vendor.
- Email – Shows the supplier’s contact email address, ensuring accurate communication and record tracking.
Smart Ordering
Enable Smart Order
This option allows the system to suggest product quantities automatically based on stock levels, usage patterns, or predefined rules.
- When enabled, the system helps reduce manual calculation by recommending optimal reorder quantities
- It minimizes stock shortages and overstocking
- Useful for businesses with regular consumption patterns or automated inventory planning
You can still manually adjust quantities even when this feature is enabled.
Product Details
- Product – Search and select the item you want to include in the order. You can type part of the product name to quickly find it.
- QTY (Quantity) – Enter the number of units you want to order from the supplier.
- Net Volume – Represents the standard unit measurement of the product (e.g., ml, grams, or pieces).
- Size – Select the product variant or packaging size, if applicable.
- Type – Choose the product category or classification. This helps in organizing inventory and reporting.
- Price – Enter the supplier’s price per unit. This value is used to calculate the total order cost.
Add Order Item
Click this button to add the selected product along with its details (quantity, size, and price) to the order list.
- You can add multiple products by repeating this step
- Each added item becomes part of the final purchase order
Notes
Use this section to include any additional information related to the order, such as:
- Delivery instructions
- Urgency details
- Internal remarks for the purchasing team
Actions
- Save – Click Save to finalize and submit the order. Once saved:
- The order is recorded in the system
- It becomes available for tracking and further actions (such as receiving stock)
- Close – Click Close to exit without saving any changes.
How to Use
- Select a supplier to load associated details
- (Optional) Enable Smart Order for automatic quantity suggestions
- Add products by selecting items and entering quantity and price
- Click Add Order Item to include them in the order
- Repeat for multiple products if needed
- Add notes for additional instructions
- Save the order to complete the process