Appointment List
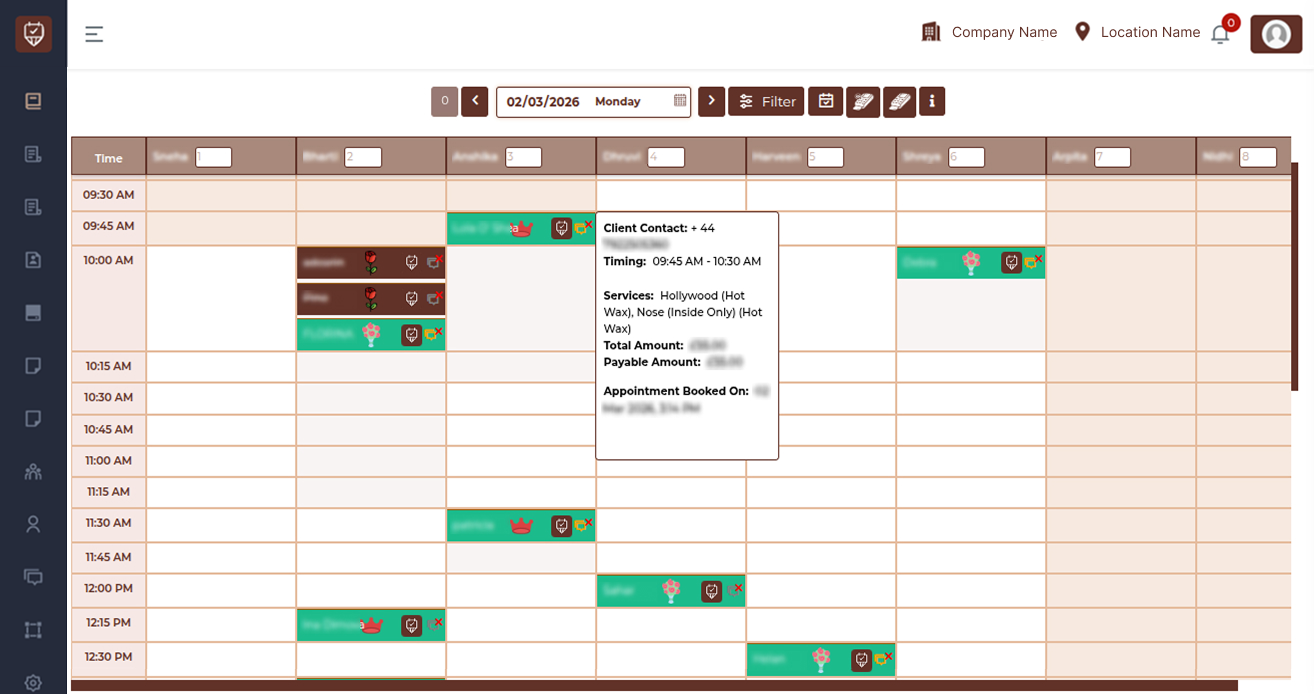
The Appointment List provides a visual, time-based calendar of all bookings for the selected date and branch. It enables front desk staff and managers to monitor therapist schedules, manage bookings, and identify available time slots in real time.
This page explains each section of the Appointment List and the meaning of the various colors, icons, and indicators.
Page Overview
The Appointment List displays appointments in a grid format organized by:
- Time slots (vertical axis)
- Therapists (horizontal axis)
- Colored appointment blocks representing bookings
The height of each appointment block reflects the duration of the service booked.
Date Navigation
At the top of the page, you can:
- Move to the previous day
- Move to the next day
- Select a specific date from the calendar
- View the selected weekday
Changing the date refreshes the appointment grid automatically.
Filter
Use Filter to refine visible appointments based on available criteria such as:
- Therapist
- Service
- Status
- Booking source
Filtering is useful when managing busy schedules.
Action Buttons
The action buttons near the filter provide quick access to scheduling tools and the feature guidance panel.
Calendar Grid Structure
Time Column
The left column shows time intervals throughout the working day.Each row represents a bookable time slot.Empty rows indicate available time.
Therapist Columns
Each column represents an individual therapist.This layout allows you to:
- View each therapist’s daily workload
- Identify free slots
- Detect overlapping bookings
- Balance staff allocation
Appointment Blocks
Each colored block in the grid represents a booked appointment.
Information Shown on the Block
An appointment block typically displays:
- Client name for quick identification
- Service indicators
- Loyalty icons
- Consultation status icon
- Quick action controls
The height of the block corresponds to the service duration.
Appointment Tooltip (Hover Details)
When hovering over an appointment block, a detailed information card appears.
Tooltip Information
The tooltip provides key booking details such as:
- Client contact information
- Appointment timing
- Services included in the booking
- Total amount
- Payable amount
- Booking creation date and time
This allows staff to review full appointment details without opening the edit screen.
Appointment Color Meanings
Appointment colors indicate booking source or status.
Green Appointment : Indicates a completed service.
Aubergine (Purple) Appointment : Represents bookings created via phone.
Grey Appointment : Indicates bookings created through the online booking system.
Brown Appointment : Represents cancelled appointments.
Red Appointment : Indicates a no-show, meaning the client did not attend.
Client Loyalty Icons
These icons help staff quickly identify client visit history and value.
Red Rose Icon : Indicates a first-time client.
Bouquet Icon : Shows the client has visited a few times but is not yet a regular.
Red Crown Icon : Represents a regular client within the standard spending range.
Golden Crown Icon : Identifies a high-value client with higher average spend.
Consultation Status Icons
These icons show the consultation form progress for the appointment.
Grey Consultation Icon : The consultation form has not been completed.
Green Consultation Icon : Both client and therapist have completed the consultation form.
Orange Consultation Icon : The client has completed the consultation form, but the therapist record is still pending.
Black Consultation Icon : Multiple treatments are booked, but one or more consultation forms remain incomplete.
Circular Colour Indicators
Circular colour markers help identify multi-client or multi-therapist scenarios.
Same Colour Ball – Multiple Clients : When multiple clients share the same coloured circle, it indicates a group booking.
Same Colour Ball – Single Client Across Therapists : When a single client shows the same coloured circle across appointments, it means the client is being served by multiple therapists.
Blank Cells (Available Time Slots)
Empty cells in the calendar represent available booking slots. Staff can click an empty slot to:
- Create a new appointment
- Schedule a walk-in
- Adjust therapist workload
Best Practices
- Keep the Appointment List open during business hours
- Review the next day’s schedule before closing
- Monitor cancellations and no-shows regularly
- Use filters during peak times
- Avoid unintended overlapping bookings
Appointment List – Create / Edit
The Appointment Create/Edit page allows staff to create new appointments or modify existing ones.This page opens when:
- A user clicks on an empty slot in the Appointment List (to create a new appointment).
- A user clicks on an existing appointment (to edit or update it).
The page contains multiple sections including appointment details, services, therapist allocation, client notes, and payment processing.
Appointment Tabs
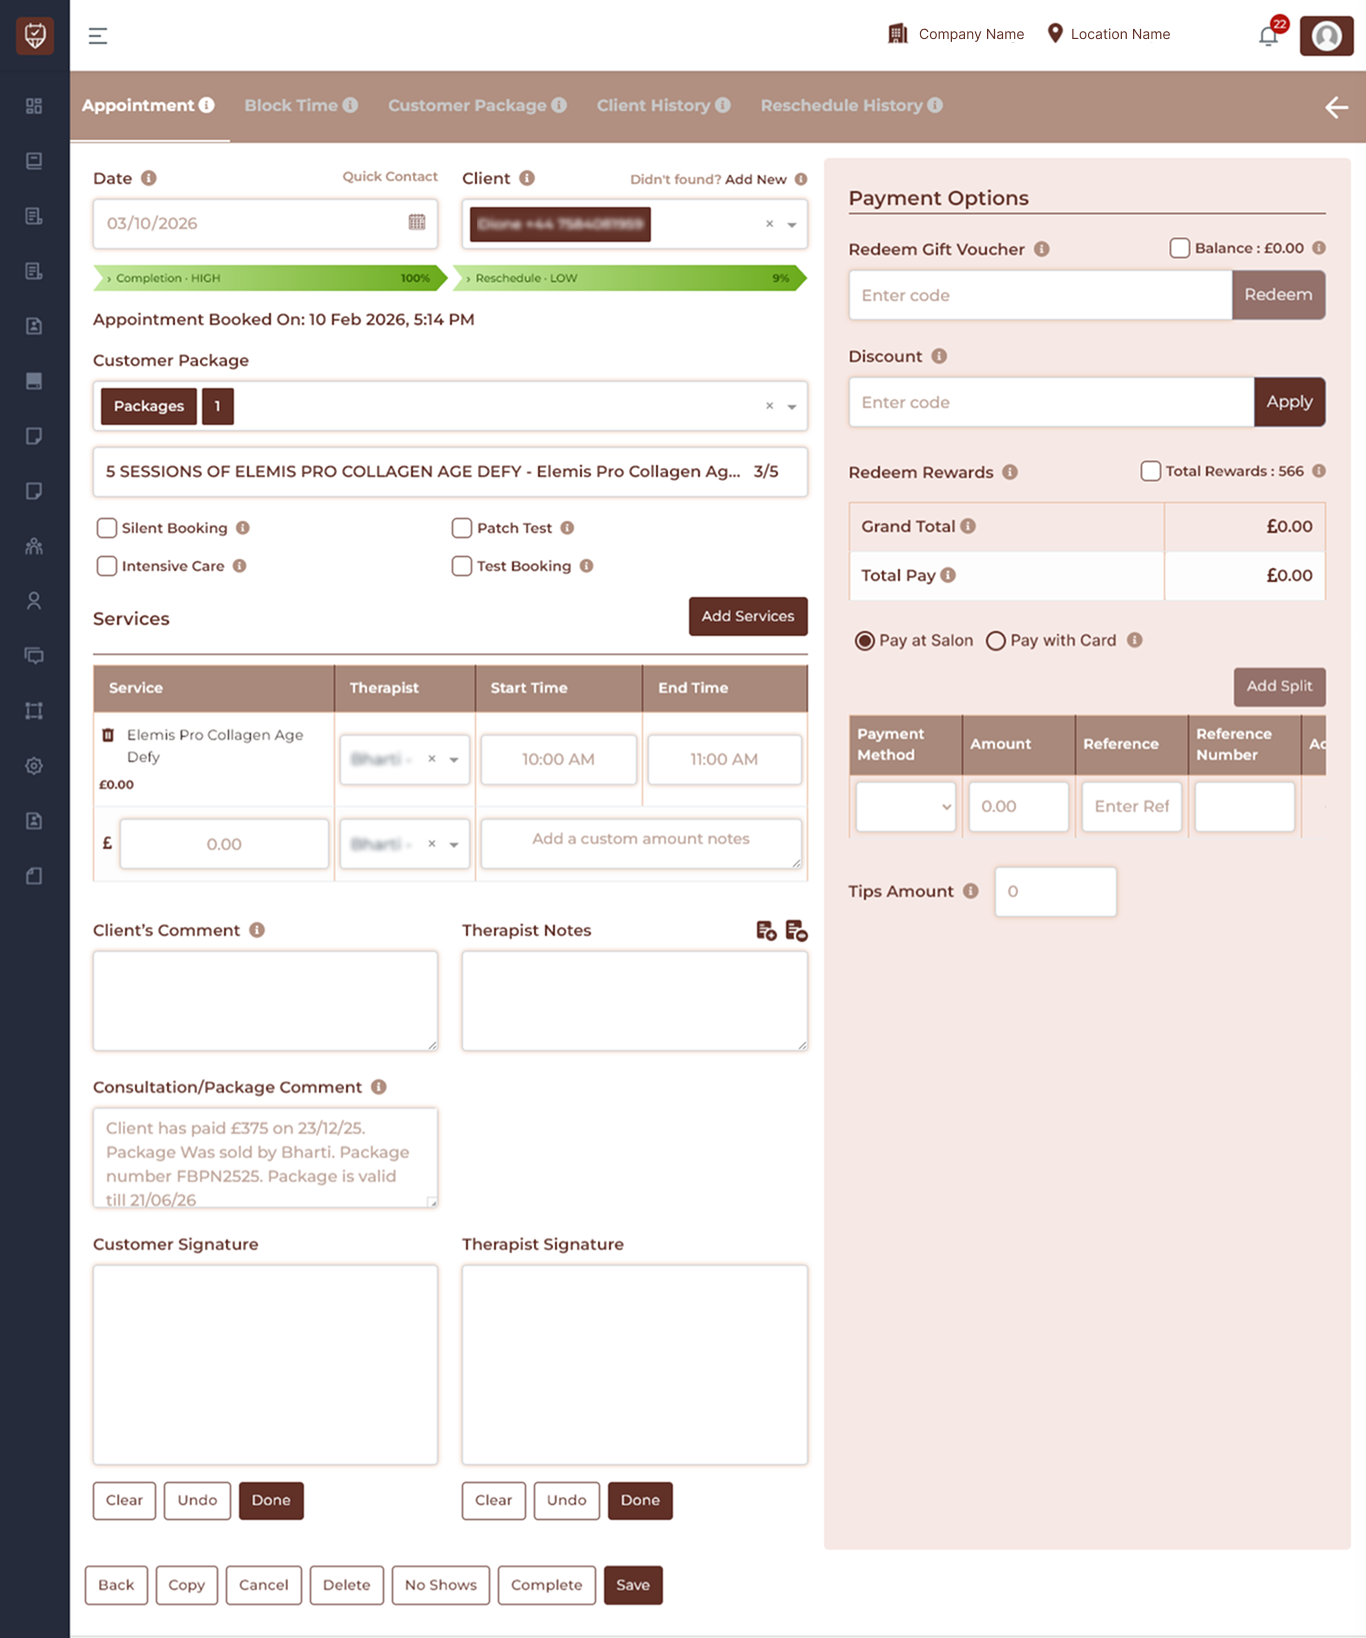
At the top of the page, several tabs are available:
- Appointment – Main booking and service information.
- Block Time – Used to block therapist availability.
- Customer Package – Apply or manage package sessions.
- Client History – View previous client appointments and records.
- Reschedule History – Displays all rescheduling records for the appointment.
Appointment Information
Date : Select the date of the appointment.
This determines the availability of therapists and service slots.
Quick Contact : Used to quickly search for an existing client using:
- Phone number
- Name
Selecting a client automatically loads their information.
Client : Displays the selected customer.If the customer does not exist, the Add New option allows staff to create a new client profile instantly.
Appointment Status Indicators
Progress indicators display booking details such as:
- Completion percentage
- Reschedule percentage
- Appointment booked time
- Last rescheduled date
These indicators help track appointment activity.
Booking Options
Several checkboxes allow additional appointment configuration.
Silent Booking : Creates a booking that is not publicly visible or shown in certain notifications.
Intensive Care : Marks the appointment as an intensive or long treatment session.
Patch Test : Marks the appointment as a patch test session for treatments requiring skin testing.
Test Booking : Used for internal testing or training purposes.
Services Section
The Services section defines what treatments are included in the appointment.
Each service row includes:
Service Displays the selected treatment or service.
Example: Hollywood Laser (Per Session)
Therapist : Assign the therapist responsible for performing the service.
A therapist can be selected from the dropdown list.
Start Time : Select the time when the service begins.
End Time : Select the time when the service ends.
Price : Displays the service price. This can sometimes be adjusted if custom pricing is applied.
Custom Amount Notes : Optional notes explaining custom pricing or adjustments.
Add Services : The Add Services button allows additional treatments to be included in the same appointment.
This is useful when clients book multiple services in a single visit.
Client Comments
This field allows staff to record notes related to the client.
Examples include:
- Client preferences
- Special instructions
- Service requests
Therapist Notes
This section is used by therapists to record treatment notes such as:
- Skin condition observations
- Treatment details
- Aftercare advice
These notes are generally internal.
Consultation / Package Comment
Used to record information related to:
- Client consultations
- Package usage
- Treatment recommendations
Payment Options
The Payment Options panel manages billing and payments for the appointment.
Redeem Gift Voucher
Allows the client to redeem a gift voucher code.
Steps :
- Enter voucher code
- Click Redeem
The system applies the voucher value to the appointment.
Discount
Apply a promotional or discount code.
Steps :
- Enter the discount code
- Click Apply
Custom Discount
Allows manual discounts to be applied.
Fields include:
- Discount type
- Discount amount
Redeem Rewards
Clients can use their reward points toward the appointment payment. The total available rewards are displayed.
Payment Summary
The payment summary displays:
- Grand Total
- VAT Value
- Total Payable Amount
These values update automatically when services, discounts, or vouchers are applied.
Partial Payment Options
Payments can be processed in multiple ways.
Options include:
- Pay at Salon
- Pay with Card
Multiple payment entries can be added using Add Split.
Payment Table
The payment table records payment details including:
- Payment Method
- Amount
- Reference
- Reference Number
This allows tracking of split payments.
Tips Amount
Staff can record any tip amount provided by the client.
This value is stored separately from the service payment.
Action Buttons
At the bottom of the page several action buttons are available.
Back : Returns to the previous page without saving changes.
Copy : Creates a duplicate of the appointment for faster booking of similar services.
Cancel : Cancels the appointment.
Delete : Permanently removes the appointment from the system.
No Shows : Marks the appointment as a No Show if the client did not attend.
Complete : Marks the appointment as Completed once the service has been finished.
Send Payment Link : Sends a payment link to the client for online payment.
Save : Saves all changes made to the appointment.
Block Time Tab
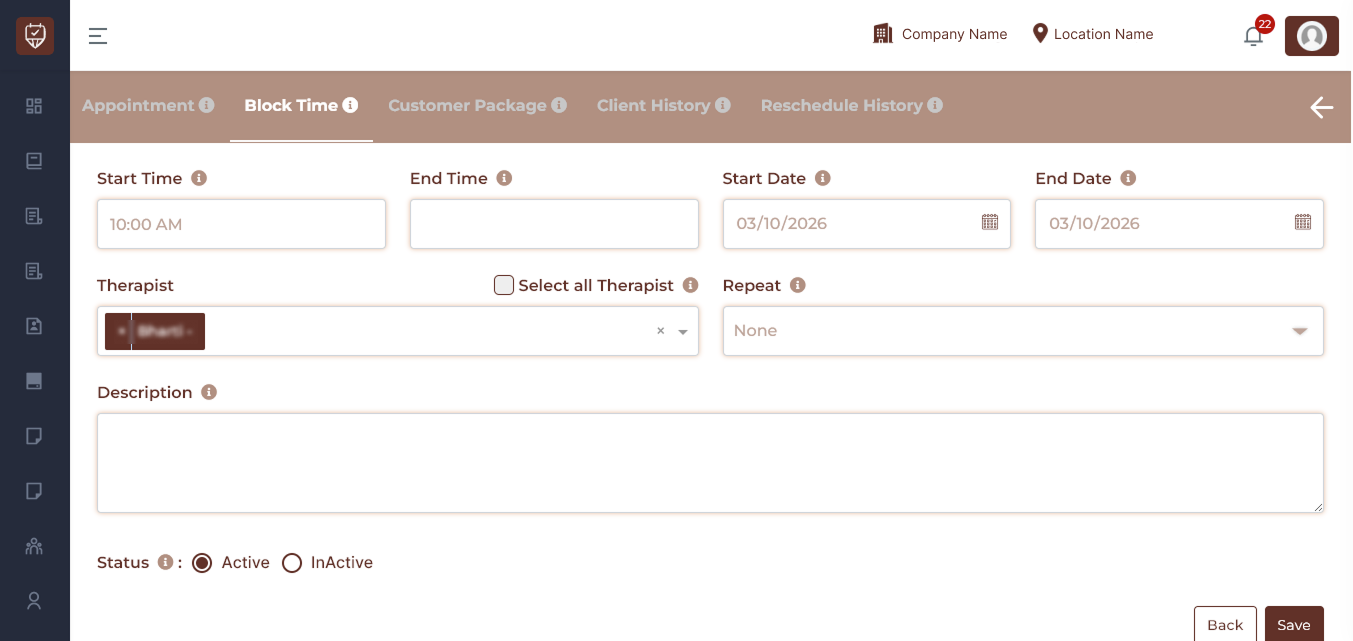
The Block Time tab allows administrators or staff to block specific periods when therapists are not available for bookings.
This feature is useful for situations such as:
- Staff meetings
- Lunch breaks
- Training sessions
- Holidays
- Maintenance or salon closure
When a block time is active, the selected therapist(s) will not appear as available during the specified period in the appointment calendar.
Add / Edit Block Time
Use this screen to block periods where one or more therapists are not available for bookings.
You can define:
- The start and end time of the block
- The date range when the block applies
- Which therapist(s) are affected
- Whether the block repeats
- A description explaining the reason for the block
Start Time : Select the time when the blocked period begins. From this time onward, the selected therapist will not be available for bookings.
End Time: Select the time when the blocked period ends.After this time, normal bookings can be made again.
Start Date : Select the first date when the block time should apply.
End Date : Select the final date when the block should apply. For a single-day block, the start date and end date should be the same.
Therapist : Select the therapist whose schedule you want to block.
Only the selected therapist’s calendar will show this time as unavailable unless the Select All Therapist option is used.
Select All Therapist : Enable this option to apply the same blocked time to all therapists.
This is commonly used for:
- Staff meetings
- Salon closures
- Team training
- Public holidays
Repeat : The Repeat option allows you to create recurring block times. Available options include:
- None – Creates a one-time block
- Daily – Repeats the block every day between the selected dates
- Weekly – Repeats the block every week on the same weekday
Description :Enter a short note explaining why the time is blocked.
Examples include:
- Lunch break
- Staff meeting
- Equipment maintenance
- Training session
This helps other staff members understand the reason for the unavailability.
Status : The Status option determines whether the block is currently applied.
Active
- The blocked period is enforced.
- The therapist cannot receive bookings during this time.
Inactive
- The block remains saved but does not affect therapist availability.
Actions
Save : Saves the block time and applies it to the calendar if the status is Active.
Back : Returns to the previous screen without saving changes.
Customer Package Tab
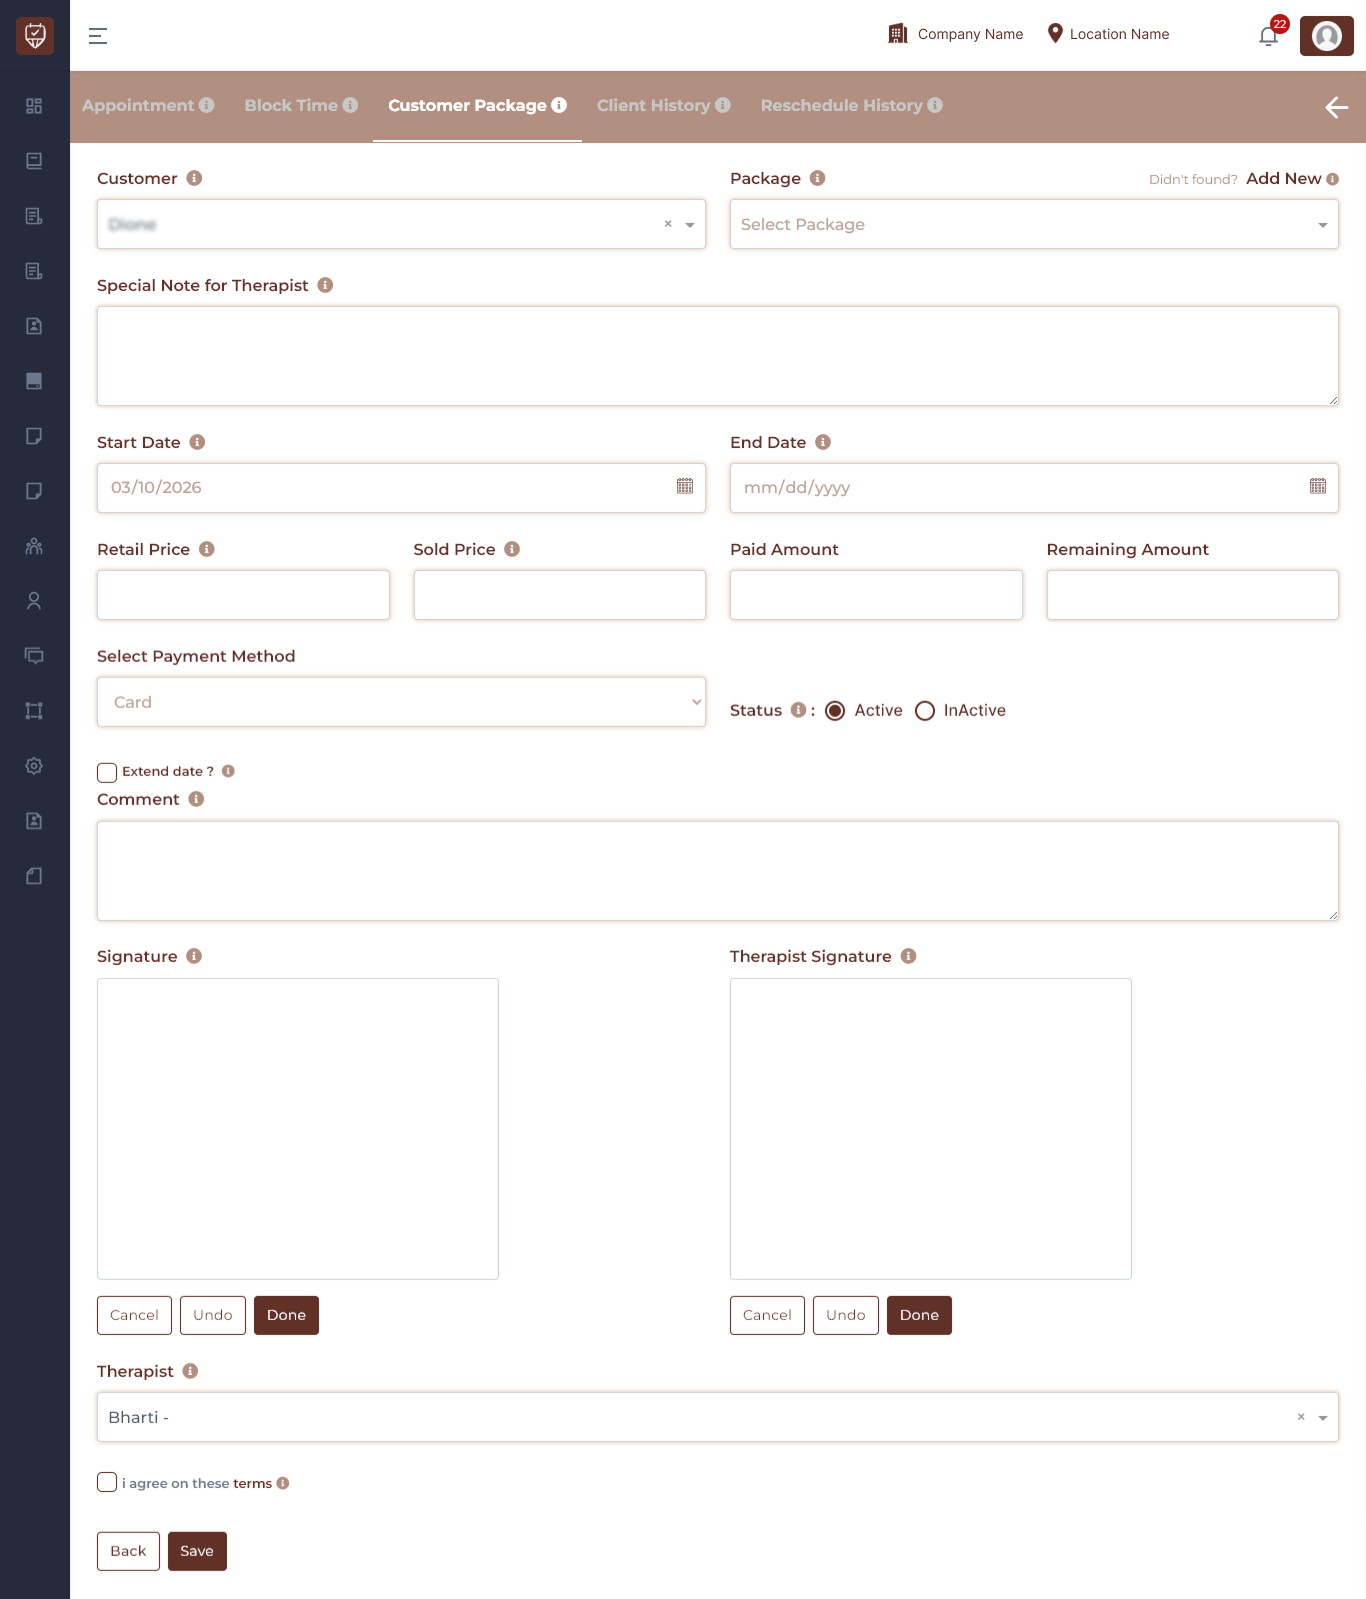
The Customer Package tab allows staff to assign a service package to a customer, define the validity period, manage pricing details, and record signatures confirming agreement to the package terms.
This section ensures proper tracking of package usage, therapist assignment, and customer consent.
Customer
Select the customer from the dropdown list.
This identifies the customer who will receive the package.If the customer does not appear in the list, a new customer profile can be created before continuing.
Package
Choose the package the customer is purchasing from the package dropdown. Selecting the correct package ensures accurate billing and service tracking.
Didn’t Found? Add New
If the required package is not available in the dropdown list, click Add New to create a new package instantly.
Special Note for Therapist
Use this field to enter important notes or instructions for the therapist.
Examples may include:
- Skin conditions
- Client preferences
- Special treatment instructions
- Important reminders
These notes help therapists prepare for treatments included in the package.
Start Date
Set the date when the package becomes active for the customer. This marks the beginning of the package validity period.
End Date
Select the final date until which the package services can be used. After this date, the package will no longer be valid unless extended.
Retail Price
Displays the standard price of the package before discounts or adjustments. This represents the original package value.
Sold Price
Enter the price the customer will actually pay. This value may differ from the retail price if promotions, discounts, or special offers are applied.
Extend Date
Enable this option if the package validity needs to be extended beyond the original end date. This is useful in situations such as:
- Customer requests additional time
- Service interruptions
- Promotional extensions
Status
Set the package availability status.
Active
- The package can be used by the customer.
Inactive
- The package is saved but cannot currently be used.
Comment
Use the comment field to record any additional information or internal notes related to the package.
Examples include:
- Special agreements with the client
- Payment notes
- Package adjustments
Signatures
Signatures confirm that both the customer and therapist agree to the package details and responsibilities.
Customer Signature : The customer signs here to confirm agreement with the package terms and conditions.Signature controls include:
- Cancel – Clears the signature box
- Undo – Removes the last stroke
- Done – Saves the signature
Therapist Signature : The therapist signs here to confirm they have reviewed the package details and accepted the responsibility for delivering the treatments. Signature controls include:
- Cancel – Clears the signature box
- Undo – Removes the last stroke
- Done – Saves the signature
Therapist
Select the therapist responsible for delivering the services included in the package. This ensures proper scheduling and service tracking.
Terms Agreement
I agree on these terms The customer must select this checkbox to confirm acceptance of all package policies, terms, and conditions. This step ensures the agreement is formally acknowledged.
Action Buttons
Back : Returns to the previous screen without saving changes.
Save : Saves the package details and assigns the package to the selected customer.
Client History Tab
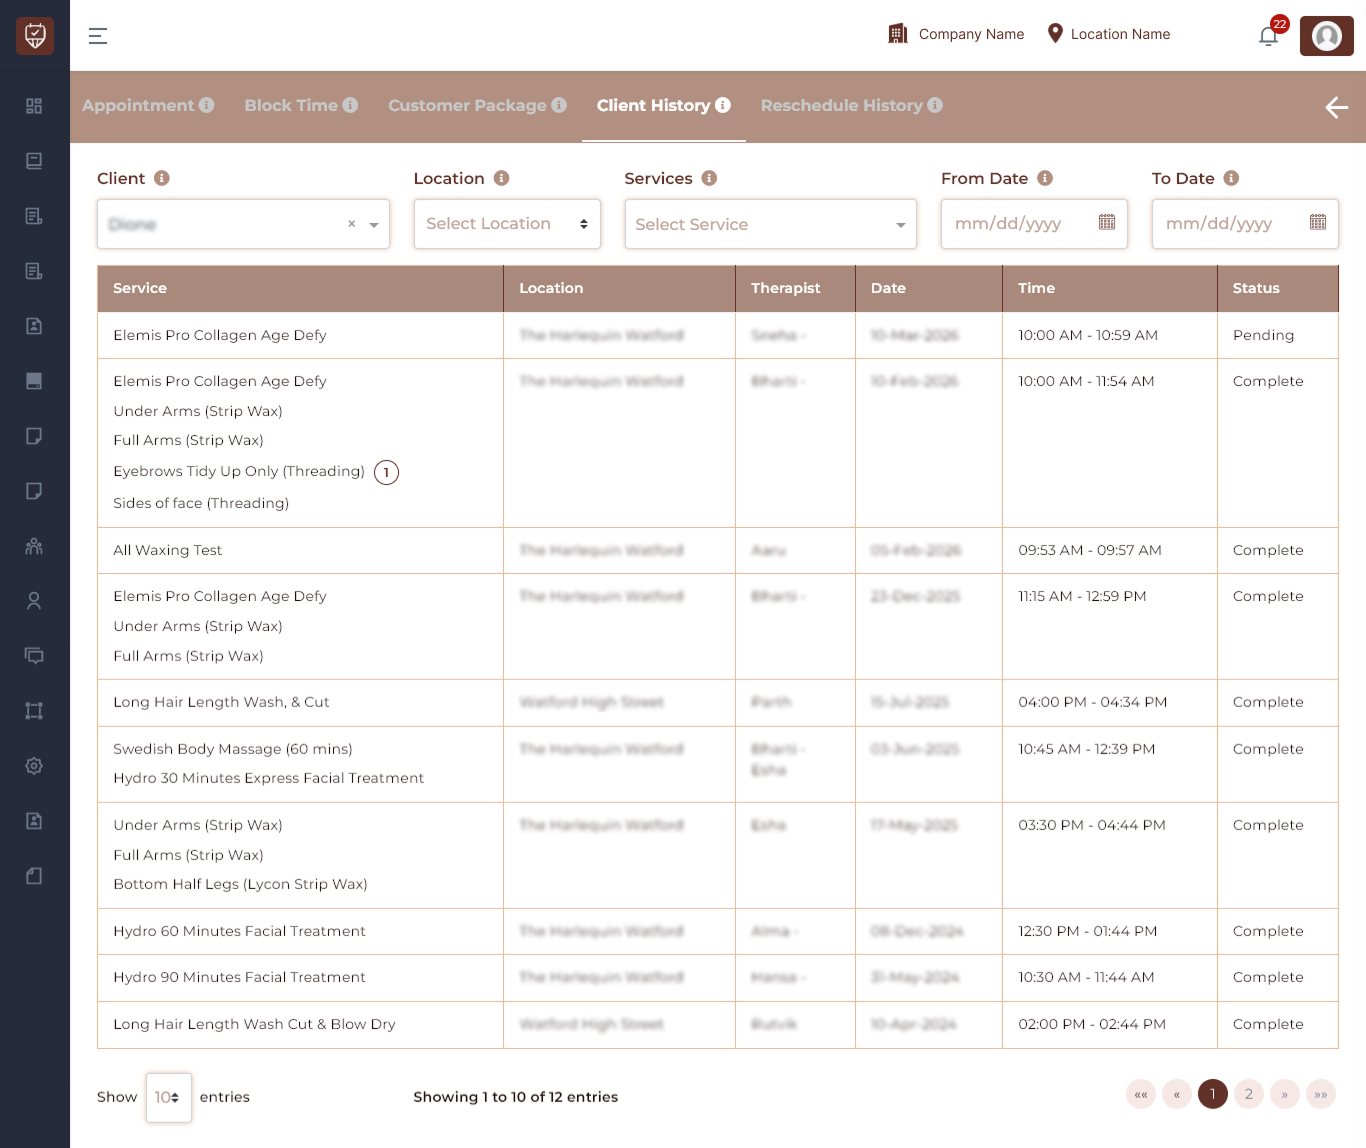
The Client History tab provides a complete record of all services that a client has received. This section allows staff to review past treatments, identify therapists involved, and analyze service history across different locations and time periods.
Using the available filters, staff can quickly locate specific appointments or service records.
Client Filters
Select the client whose service history you want to view.
The filter section allows users to narrow down service history records based on different criteria.Once a client is selected, the system loads all recorded services associated with that client.
Location
Use this filter to view services performed at a specific branch or location. This is useful when the business operates across multiple branches and you want to review services performed at a particular location.
Services
Select a specific service to filter the history by treatment type. This helps locate records for a particular treatment, such as:
- Laser treatments
- Waxing services
- Patch tests
- Tinting services
From Date
Choose the starting date for the history you want to review. Only records from this date onward will be displayed.
To Date
Select the ending date to complete the date range filter. The system will show all services performed between the From Date and To Date.
Service
This column displays the service or services performed for the client. If multiple services were booked together in the same appointment, they may appear grouped within a single entry.
Service Count Indicator A small numbered badge next to a service name indicates how many times the client has received that service.This helps staff quickly understand service frequency.
Location
Displays the branch or location where the service was performed. This helps track services across multiple branches.
Therapist
Shows the therapist who performed the treatment. This information helps track therapist assignments and client preferences.
Date
Displays the date when the service appointment took place. This helps staff review the timeline of treatments.
Time
Shows the appointment duration, including both the start and end time of the service.
Status
Displays the current status of the service. Common statuses may include:
- Complete – The service was successfully completed
- Pending – The service is scheduled but not yet completed
- Cancelled – The appointment was cancelled
Reschedule History Tab
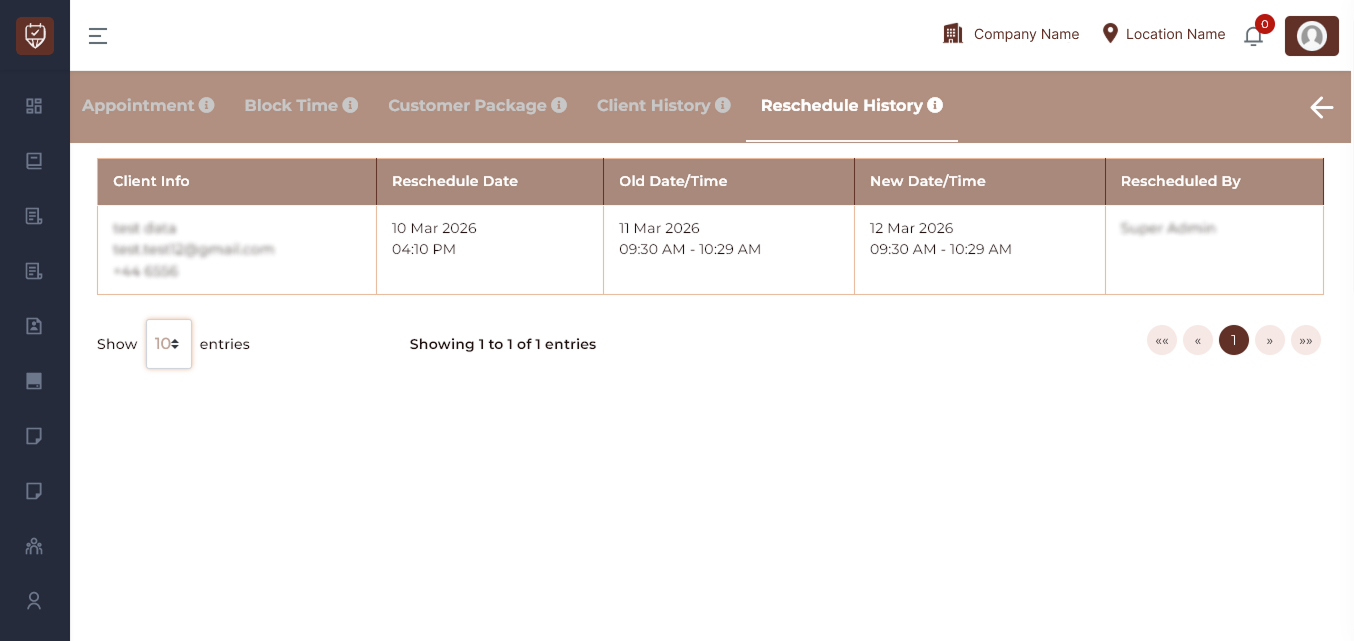
The Reschedule History tab records all changes made to an appointment’s scheduled date or time.
It provides a complete audit trail of when the appointment was rescheduled, what the original schedule was, the updated schedule, and which user performed the rescheduling action.
This feature helps staff track appointment changes and maintain accurate records of scheduling updates.
Reschedule History Table
The Reschedule History table lists every rescheduling event associated with the appointment. Each row represents a single reschedule action.
Client Info
This column displays the client’s contact information, including:
- Client name
- Email address
- Phone number
This helps identify which client’s appointment was rescheduled.
Reschedule Date
This column shows the exact date and time when the appointment was rescheduled.
Old Date / Time
Displays the previously scheduled appointment date and time before the change was made.
New Date / Time
Displays the updated appointment date and time after the rescheduling action.
Rescheduled By
This column shows the user who performed the rescheduling action.
Examples may include:
- Admin
- Receptionist
- Branch Admin
This helps maintain accountability for schedule changes.
Purpose of Reschedule History
The Reschedule History feature helps organizations:
- Track all appointment schedule changes
- Maintain a clear record of original and updated appointment times
- Identify who performed the rescheduling action
- Provide transparency and accountability in appointment management